denver kitchen and bath design

Greenwood Village Kitchen

This new home in Greenwood Village belongs to one of the nicest families I've ever met.  This kitchen is a true reflection of their style.  It is warm and inviting, but feels elegant and sophisticated at the same time.  When I first met them in 2012, they had yet to break ground on this house. Here are a few of the highlights in this kitchen:

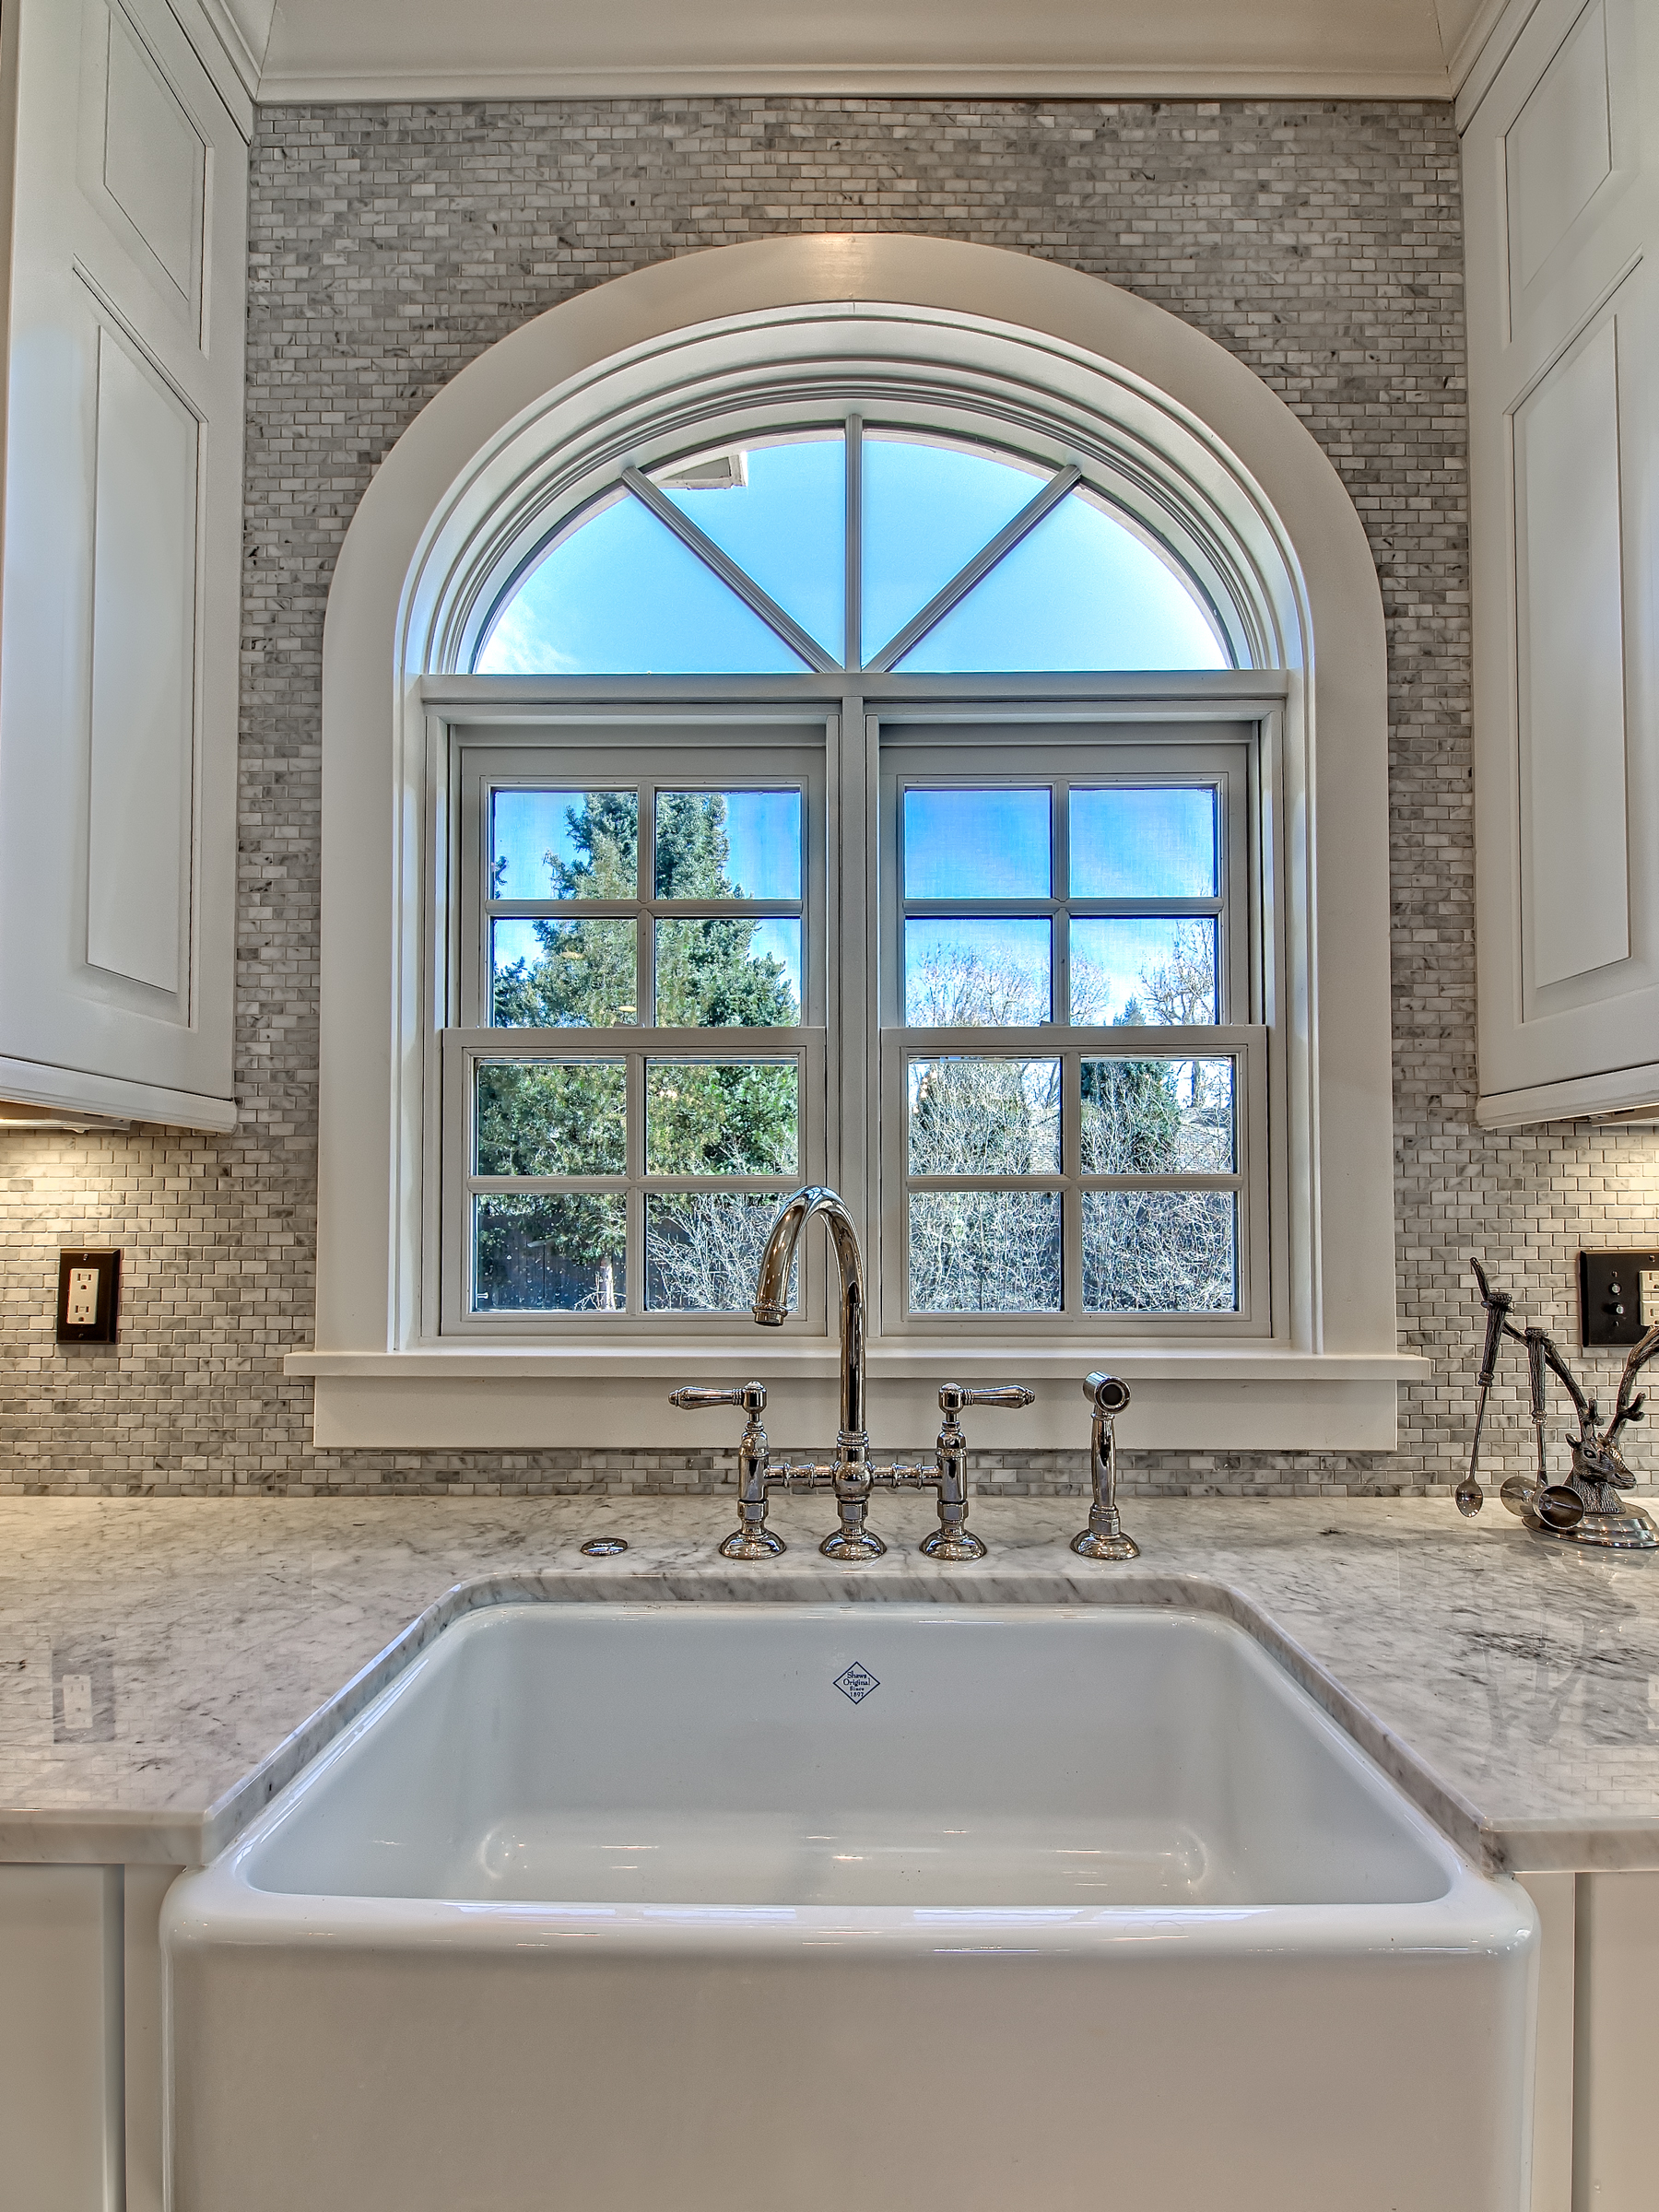
  • Originally, the sink was in the southeast corner of the kitchen.  It was in an area that I felt would become a choke point, especially for a family of 5.  I moved the sink to the East wall and added an arched window that was not previously there.

    I incorporated a traditional Rohl farmhouse sink under a new arched window for dramatic effect.

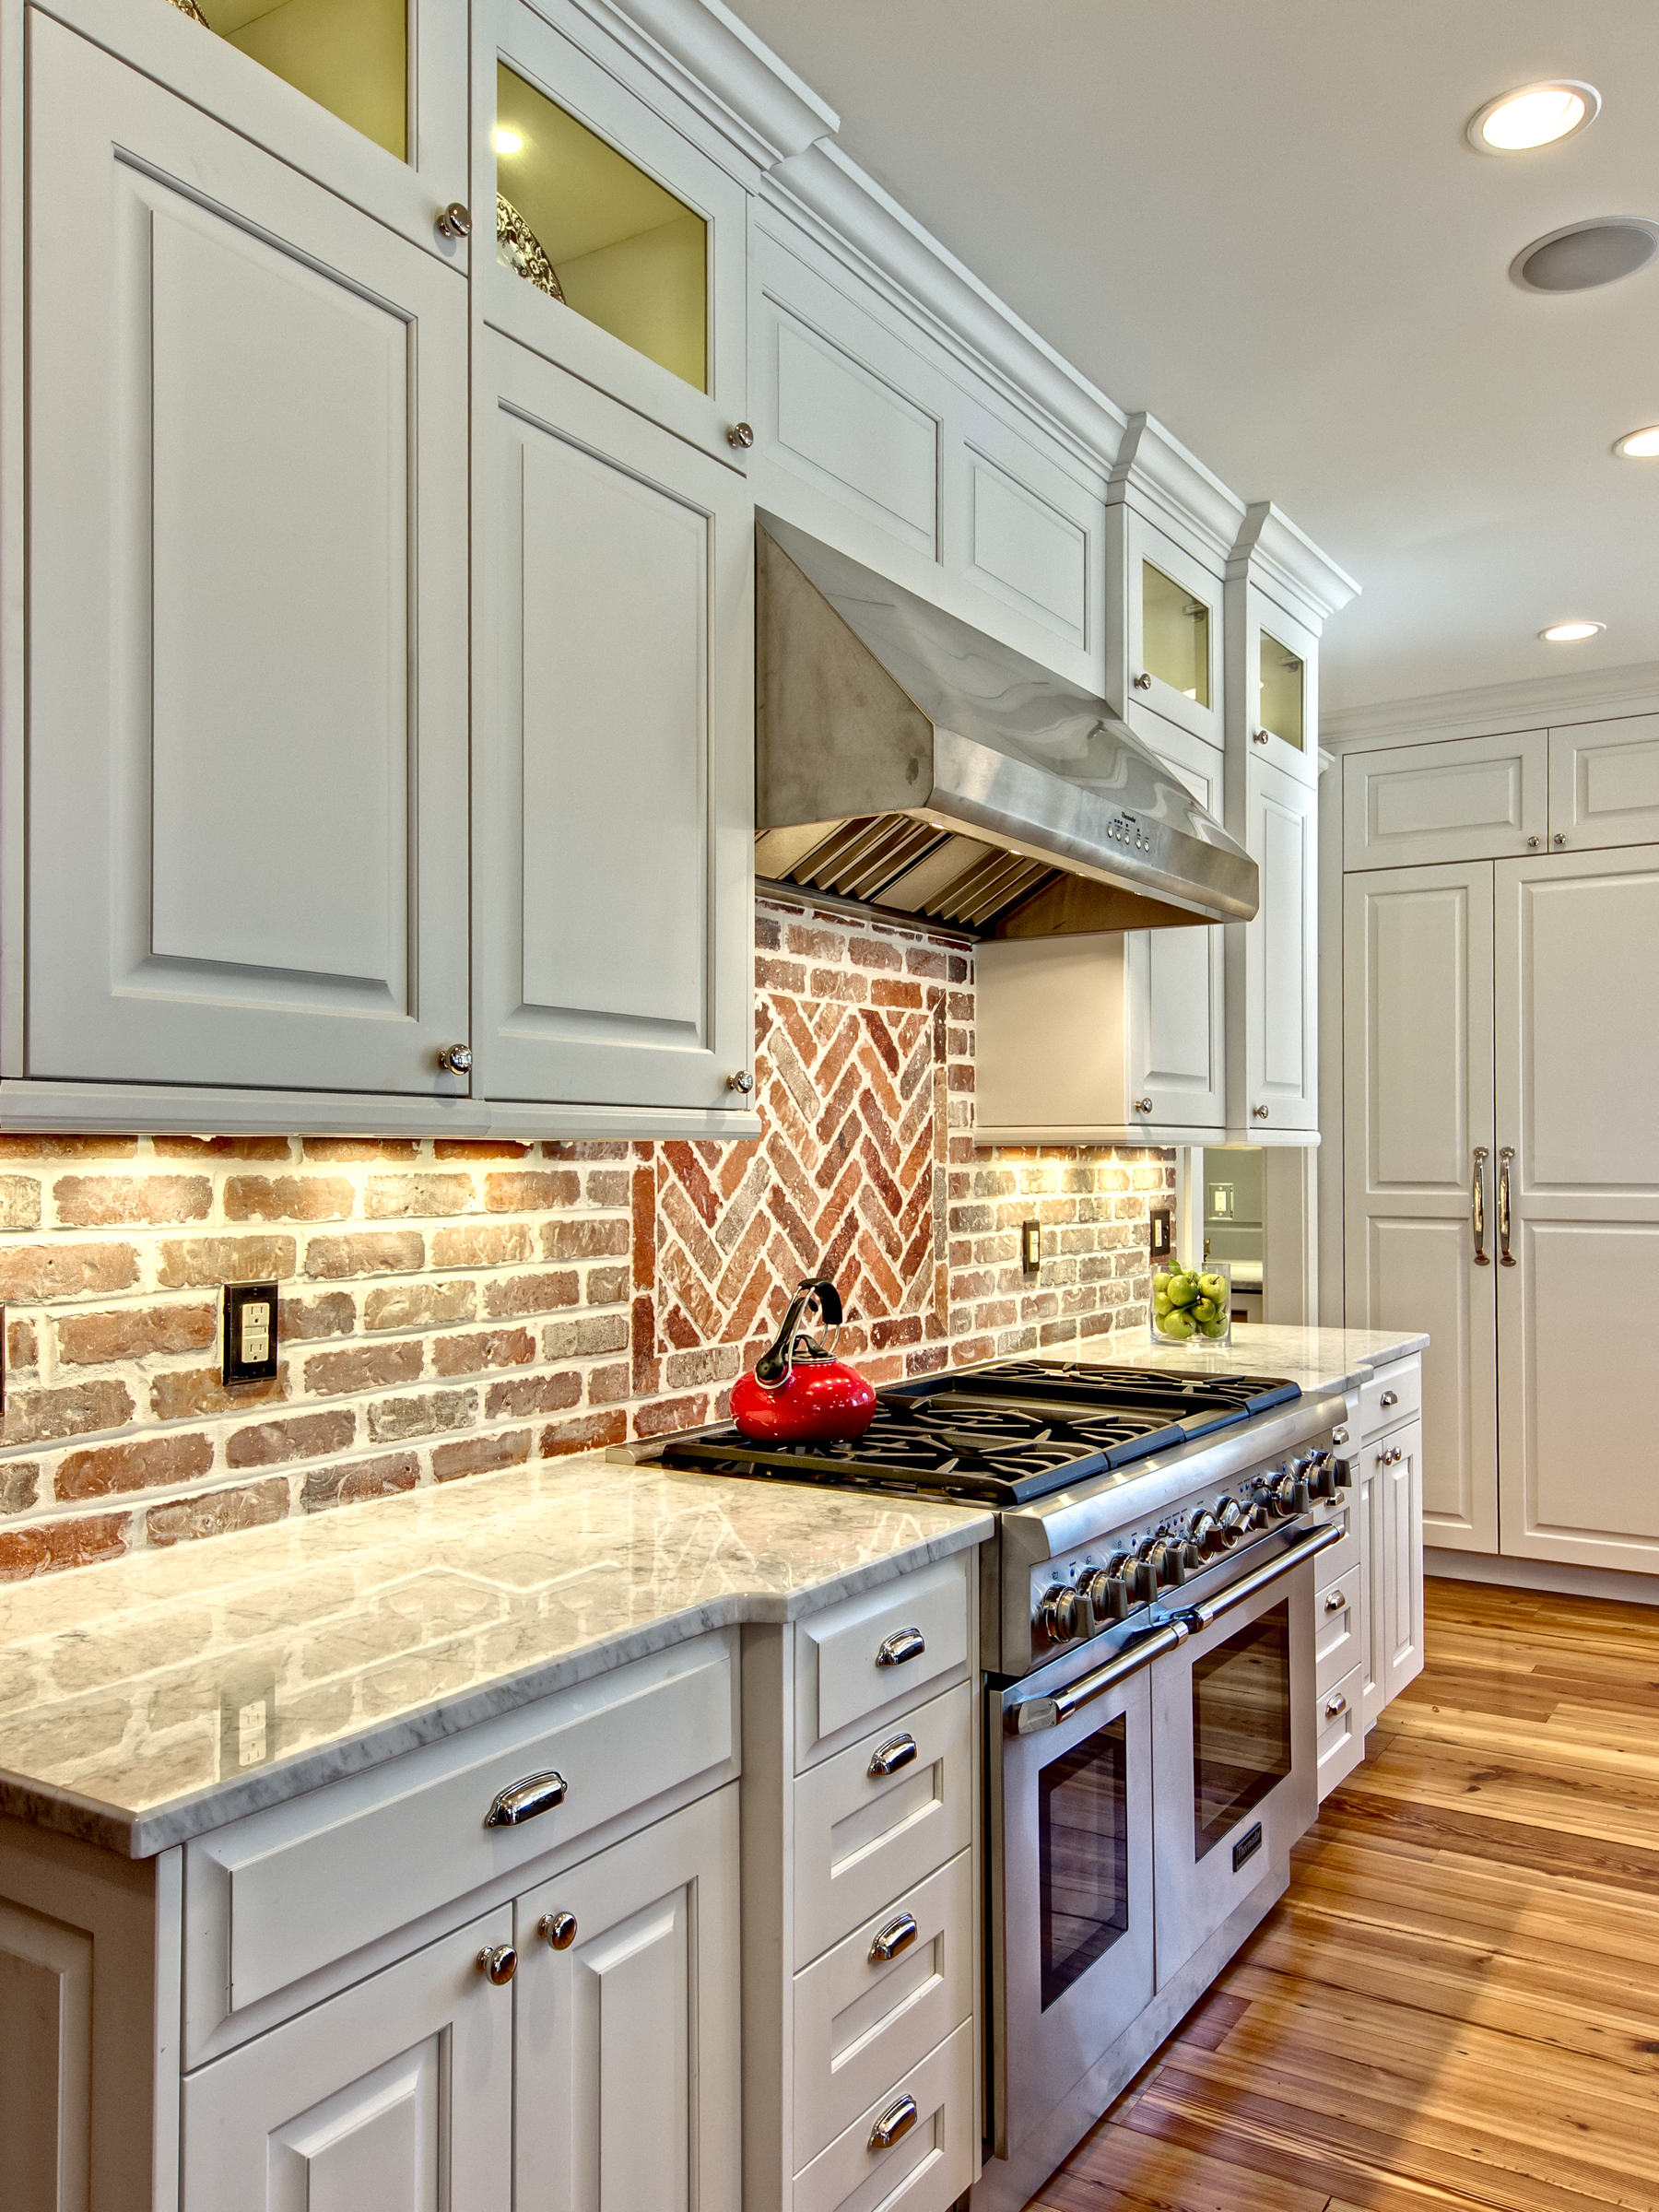
  • The North wall of the kitchen (which is the wall with all the brick) was really lacking any balance.  I moved the 48" dual fuel Thermador range onto that wall and then flanked it with symmetrical cabinetry.  All of the top boxes are individually lit with LED puck lights.

The herringbone pattern insert of bricks above the range breaks up the standard brick pattern in a way that is interesting.

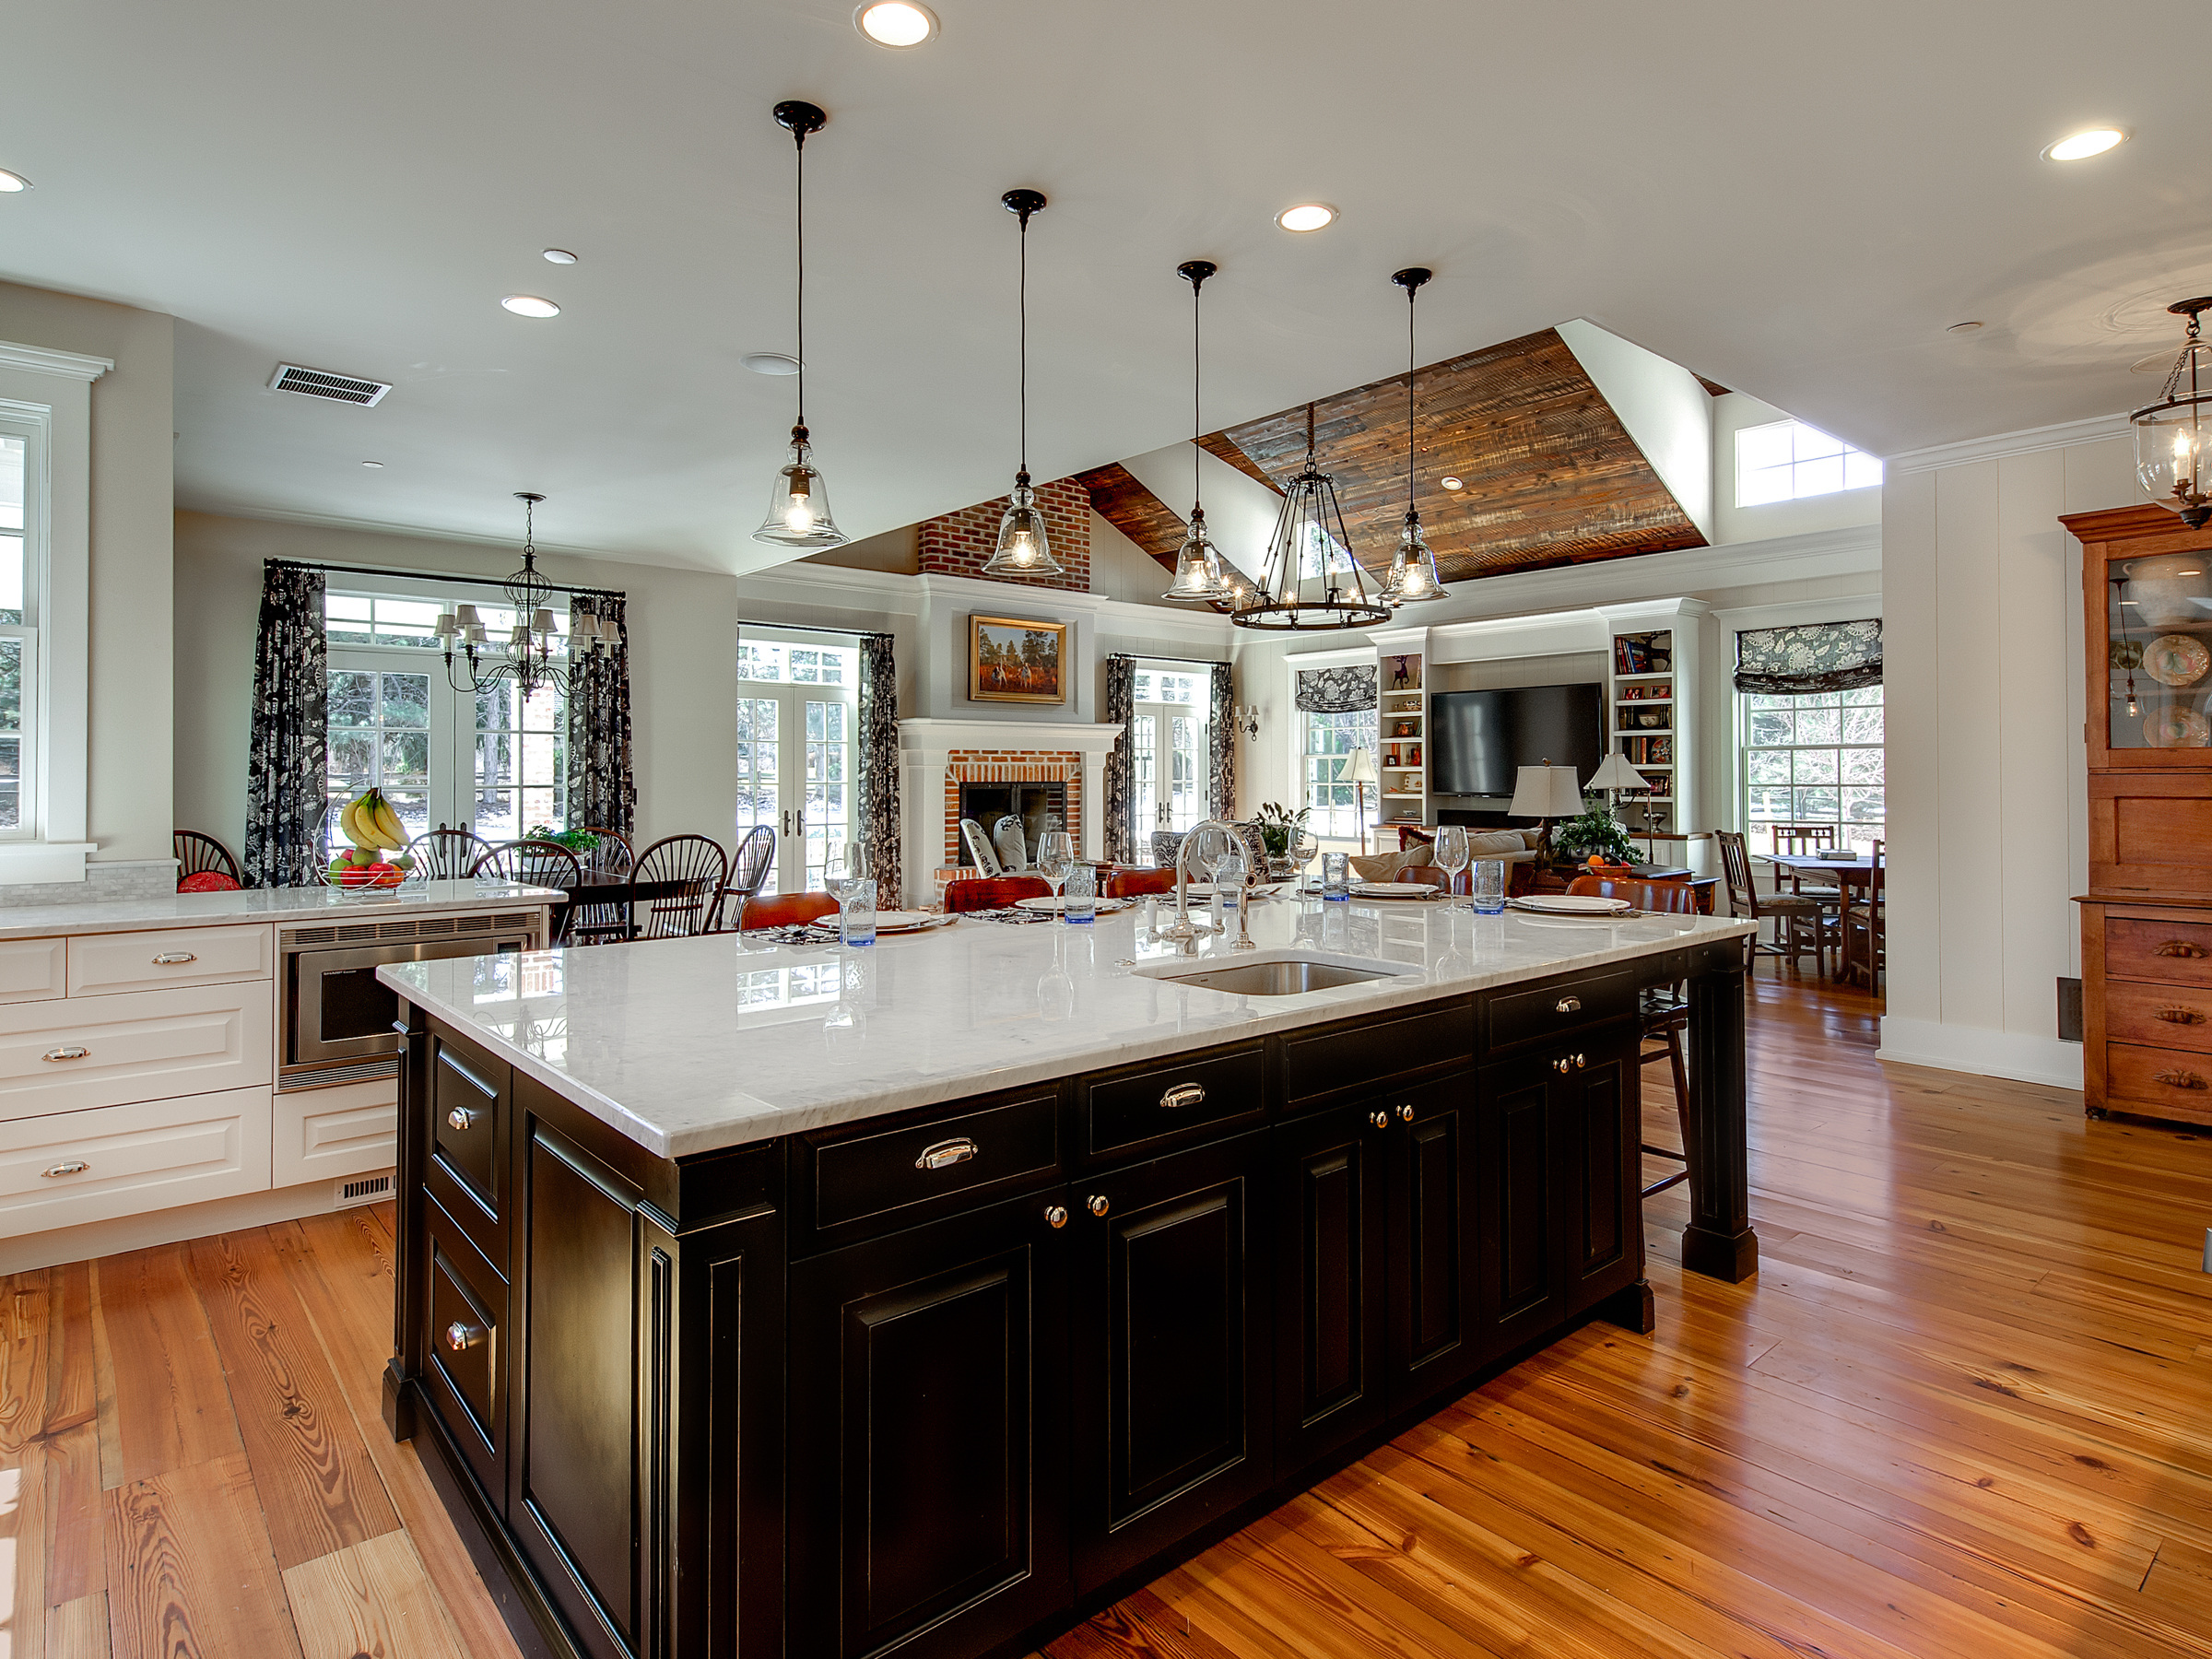
  • I contrasted the white perimeter cabinetry with a black paint rub-through finish on the island.  The implied weight of the finish provides a visual anchor for the kitchen.

Interior Intuitions Brookside. 6 Hi Res

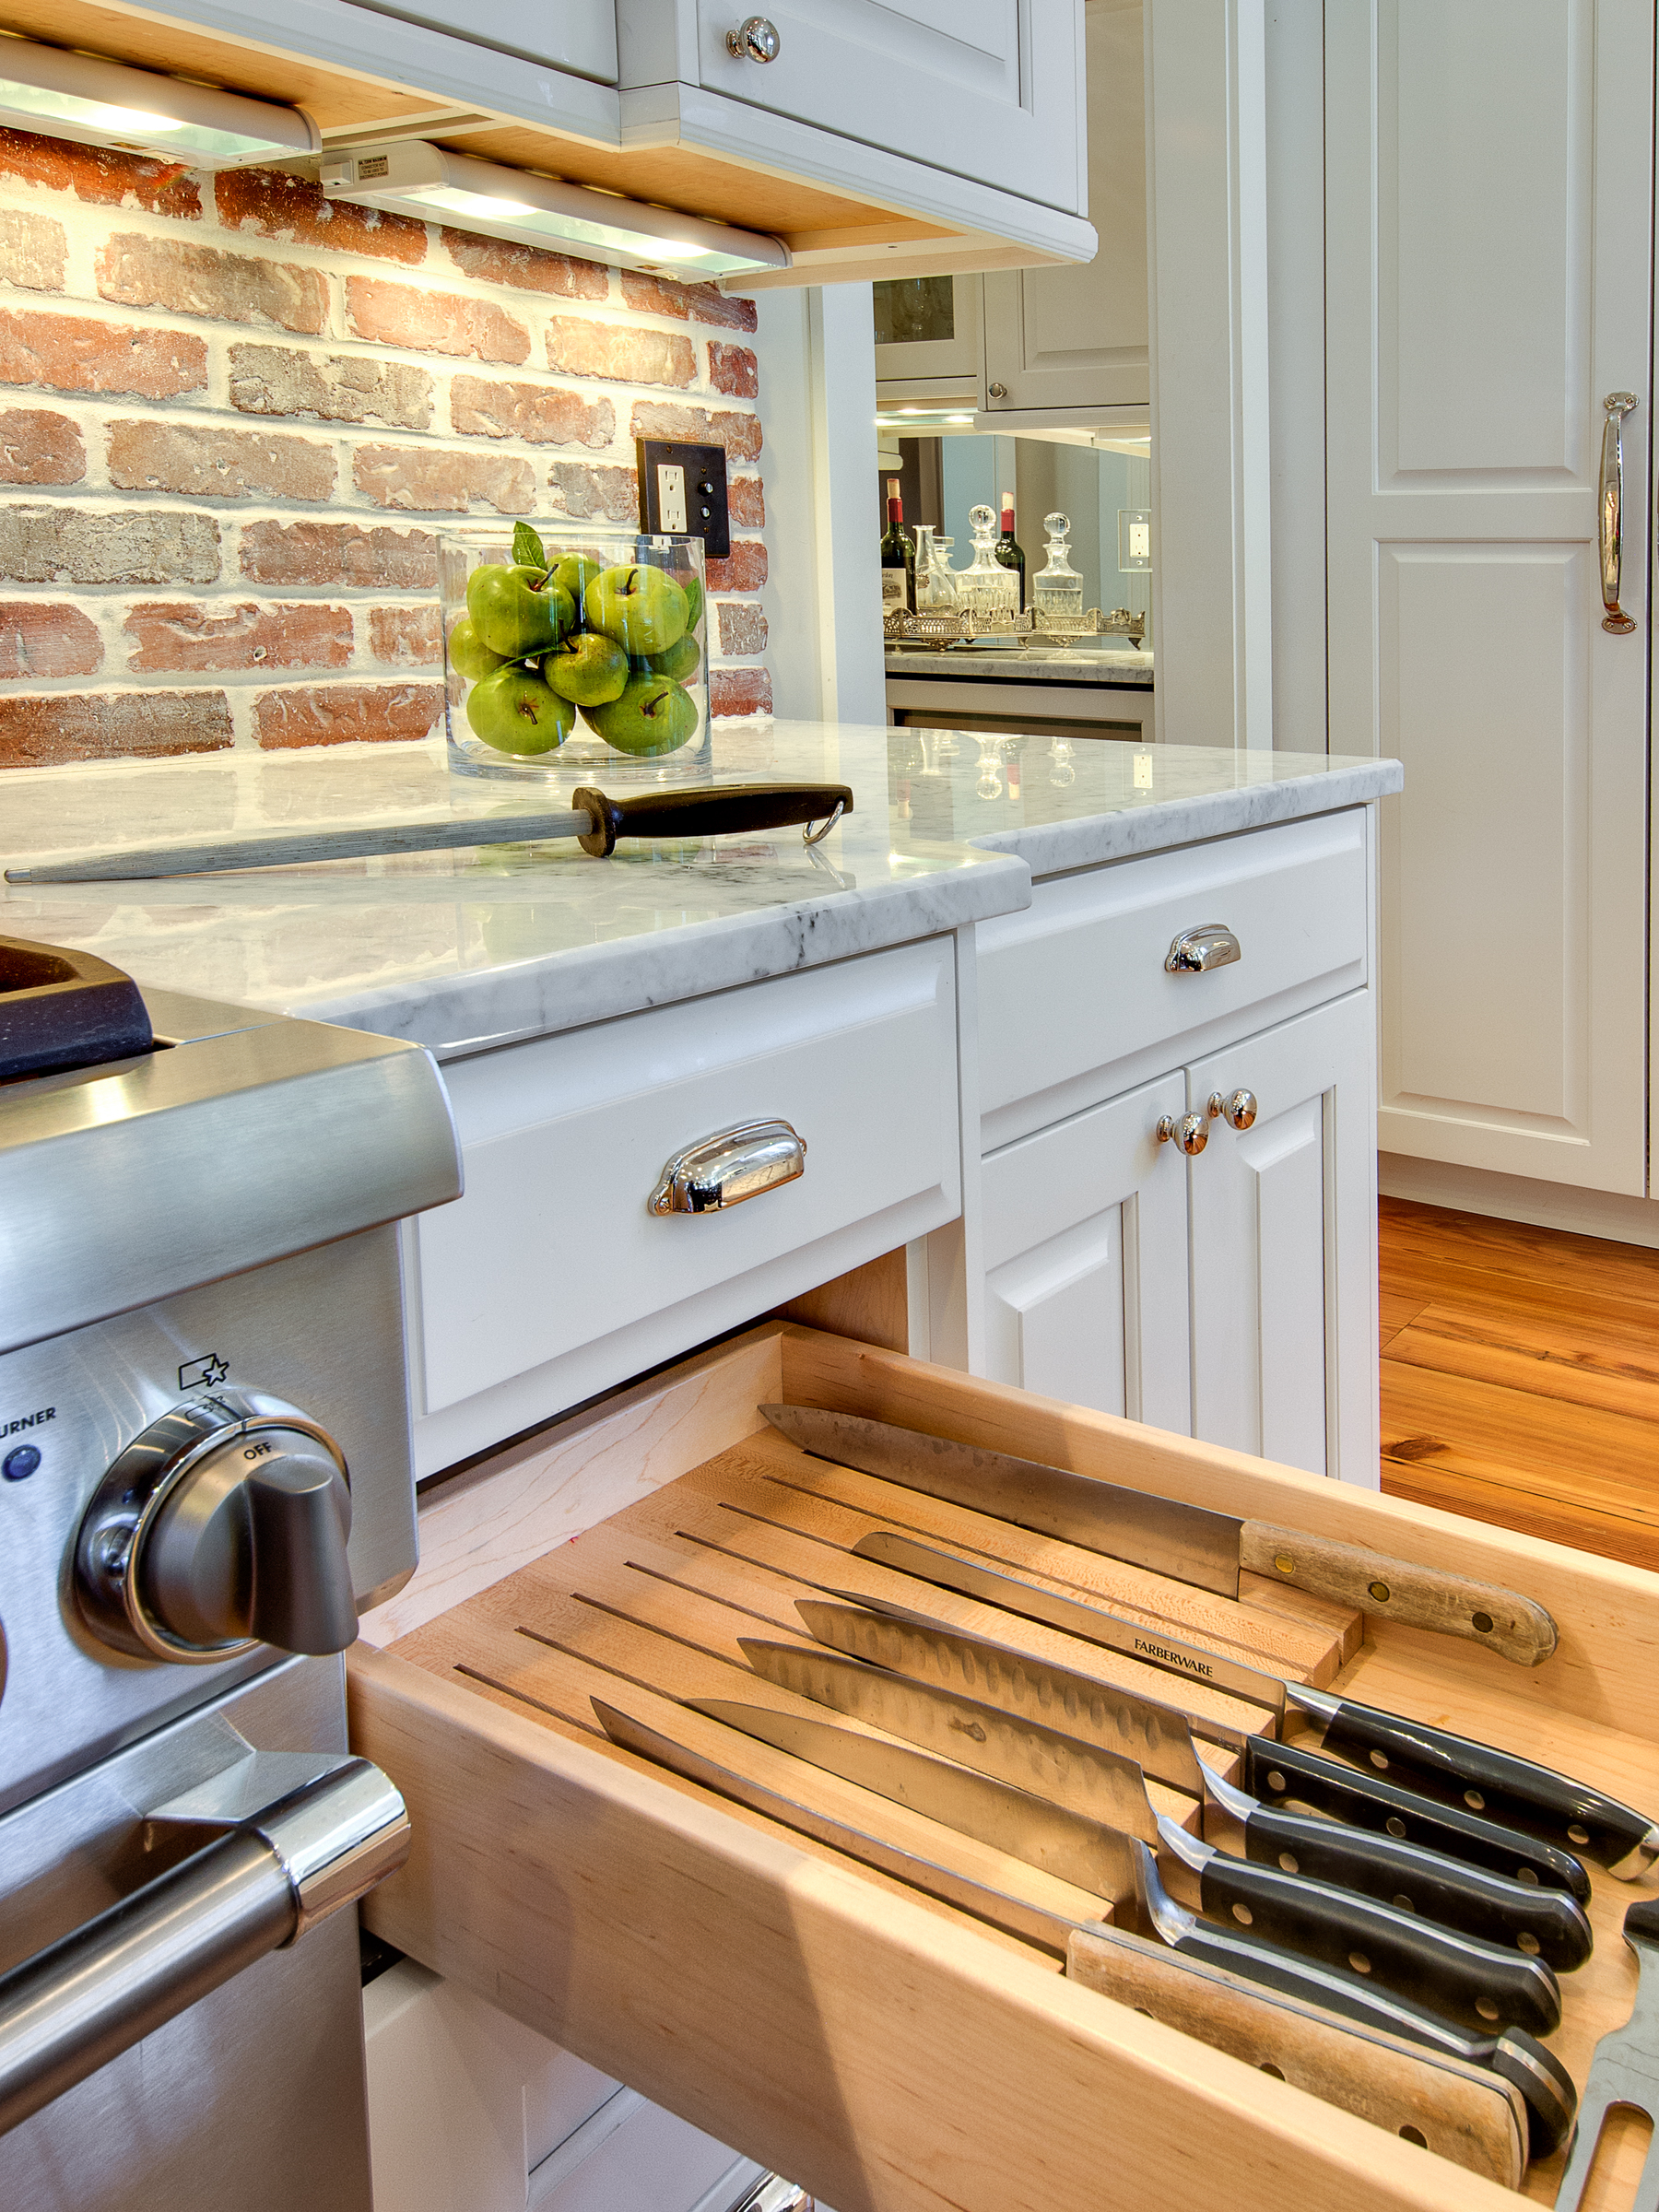
  • Lots of fantastic storage inserts...

    Knife Block

    CLICK BELOW TO SEE ALL IMAGES OF THIS PROJECT

[gallery type="rectangular" ids="889,884,891,879,882,887"]

Cherry Hills Village - Master Bathroom

We finished this bathroom late in the summer.  I was referred to the client by Jones Custom Builders, a really great building company that I have worked with on a few projects.  It's a classic styled bathroom.  The flooring in the bathroom is basketweave carrara and black marble.  The countertop is Super White Quartzite.  Brizo fixtures are installed throughout the bathroom. My favorite part of this bathroom is the inlay of Italian marble on the back wall of the shower.  This decorative danse pattern is cut using water jet technology and comprised of thassos and carrara marble.

[gallery columns="2" type="square" ids="852,853"]

Construction Zone Shots - Traditional White Kitchen - Greenwood Village

A few shots from a job site in Greenwood Village.  This spectacular home is built in a southern traditional style.  It would feel right at home in North Carolina or Georgia.  This kitchen has TONS of storage, seating for 5 and a full set of professional grade appliances that will be installed soon.  Clients are hoping to get in before Christmas! [gallery columns="2" type="square" ids="845,844,843"]

New Kitchen and Bath Projects Fall 2013

The first snow of the year is predicted to fall this weekend.  It's only the first week of October, but after living in Colorado for almost 5 years now, it's not surprising that we will have snowy weather on Friday and sunny 70 degree weather on Sunday.  Go figure. I'm pleased to announce that I have recently been retained to work on four new projects.

A master bathroom remodel in Cherry Creek North:  We're going for a sleek transitional look.  I am specifying large format porcelain tile (18 x 36) for the flooring and a wainscot tile that is 12 x 24.  I'll tie everything together with and carrara accents, and then add some interest with vibrant colors on the walls.   The new frameless European shower will be a vast improvement.

Just up the street from the master bathroom remodel is a house owned by a couple with a young child.  It's a wonderful old house that has a newer addition on the back of it.  Problem is that the new part of the house does not tie into the old part.  There are several areas I am working on in this project including, the master suite, kitchen, great room, mudroom, entry way, and flooring.  The homeowners are very involved with the process and are excited about bringing this wonderful house together into one cohesive home.

You may have seen pictures on this blog of a classic home restoration project that I completed about a year ago...That homeowner referred me to his neighbor just down the street, and we are now currently in the design phase on her master bathroom.  Her home is very traditional, with clean lines.  I plan to give her a new bathroom that is really beautiful - but most importantly, it is going to feel like it belongs in the house.

I was also hired on to a kitchen remodel project up in Boulder.  Fortunately, this couple avoided any major flood damage - many of their neighbors are still recovering.  We're going to update their kitchen to something totally sleek and modern.  High gloss lacquer, white glass, textured laminates and quartz counters are going to make this space really POP.

We are also finishing up installation of new construction in Greenwood Village.  That project should be complete by Thanksgiving.

I will report back with pictures soon!


Custom Glass Wine Enclosure with a View!

My clients asked me to design an area to store their wine inside their corner unit on the 28th floor of The Spire building, in downtown Denver.  I found the wine racking system locally here in Denver.  VintageView; a Denver based wine cellar company provided the interior racking system.  None of their standard units were perfect for our application, so they made a custom rack for us and delivered it directly to the building.  The sides of the racking system are made out of a high quality clear acrylic that is 3/4" thick.  Each rod is polished stainless steel.  In all, the unit weighs in at over 250lbs and is extremely sturdy.  It is a free standing system that can be placed anywhere. We chose to enclose the 350 bottle capacity wine rack with a custom glass surround.  1/2" industrial grade tempered glass was used and we worked with Denver Glass Interiors to create the finished product.  Not shown in this photo: LED lights are strategically placed along the floor.  They shine upward - creating a really unique effect for entertaining.

I know what you're thinking - with all that light, it's really going to mess with the wine!  AHH HAAA - I brought in a special commercial window tinting specialist to advise on this.  As it turns out, the windows in this LEED certified building are all super Low E...meaning they block 99% of all UV rays, and a lot of the heat.  Also - the patio of the unit above this apartment casts a year long shadow over the windowed area where we installed the glass enclosure.  But just to be sure, the homeowners also had auto-blinds installed behind the wine rack.  The blinds are operated by remote control and can be closed in any situation where directly sunlight makes its way into the apartment.

I think this wine enclosure is awesome.  It was the first one I had ever designed and I think that it turned out amazing.  I can easily see using this version or a modified version of it (possibly temperature controlled) in any wine enthusiast's home.

This 10' tall wine enclosure has a 350 bottle capacity.


Water Jet Technology in the Bathroom

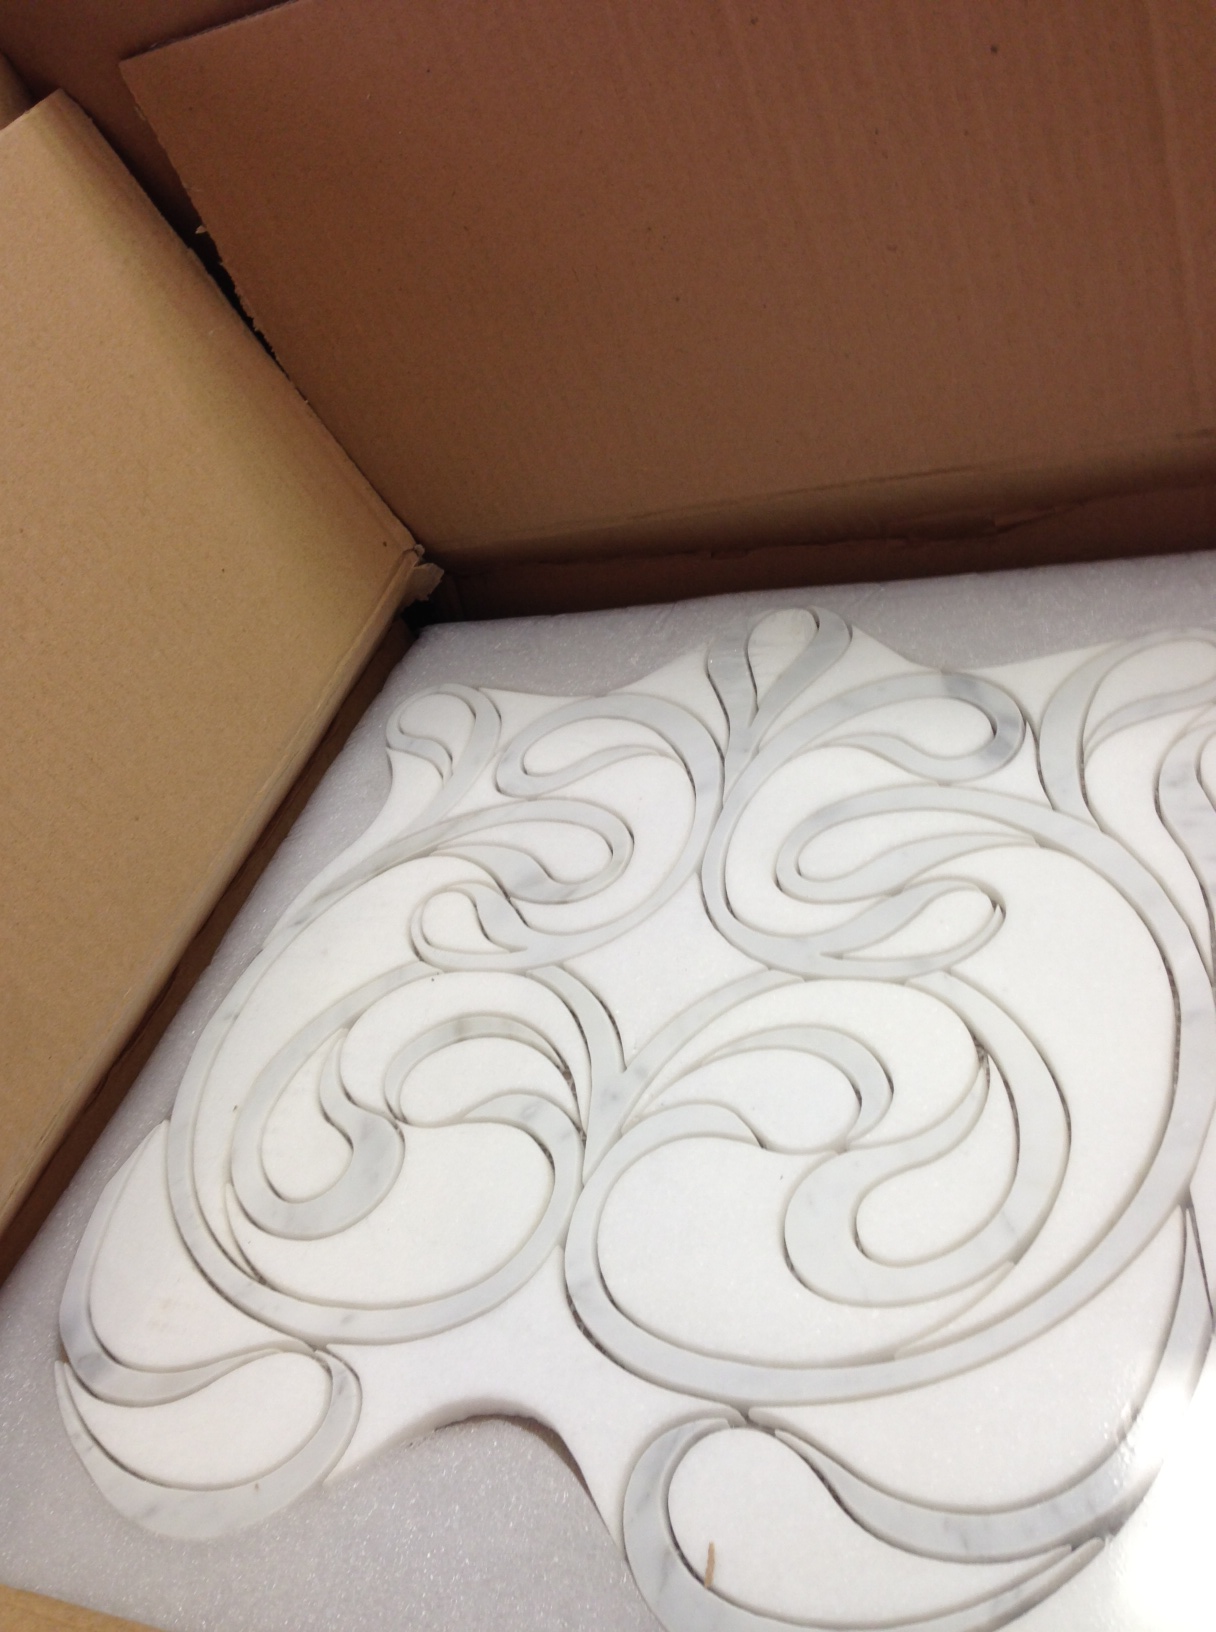
I've posted in the past that water jet technology is making its way into stone and tile manufacturing.  It's allowing the manufacturers to cut really intricate designs into the stone and create some very elegant mosaic patterns.  Below, a quick shot of a water jet natural stone mosaic (created out of thassos and calcutta gold marble) that I received in my office this week.  We are using 8 of these beautiful mosaic tiles to create a 2' x 8' mural in a shower in Cherry Hills Village.  I will post photos of the finished bathroom once we are done and include some detail shots of the mosaic as well. Water Jet Tile, Artistic Tile


Bathroom Project Featured in 5280 Home Magazine June 2013 Issue

A bathroom project that I finished about a year ago is featured in this month's 5280 Home Magazine. Here is a link to the article:  TotalTranquility_June2013_5280Home

Installation of Beautiful Stonewood Granite

Stonewood Granite is pretty cool stuff.  

I'd never seen it before about two months ago.  We found this slab at The Stone Collection in Denver.  This picture is from a project in Observatory Park, Denver.  The granite was installed on Tuesday....It's really striking when you see it up close.  Of course, we'll get some pro shots of the finished project when it is complete.


STONEWOOD GRANITE

Central Park West in Cherry Creek

This apartment located in the Cherry Creek neighborhood of Denver could very easily be transported to New York's Upper West Side and feel right at home.  My client wanted something small and elegant, but still functional.  I was hired to design the kitchen, hall and butler's pantry, master bathroom, and one guest bathroom. I employed a pure white cabinet scheme in all the spaces for a dramatic contrast vs. the dark ebony floors.  Glass, white marble, and polished nickel hardware are used throughout the entire apartment.

[gallery type="square" ids="759,760,761,762,763,764,765,766,767"]

Transitional Bathroom Remodel - Bonnie Brae Neighborhood Denver

I always say that I strive above all else to keep the clients' vision at the heart of my design.  It's a real sticking point for me.  Honor that vision from start to finish.  The first time I met these clients, they communicated to me how much they love the look of marble.  They also wanted a space that was "transitional" in style.  The new bathroom needed to be modern, yet also feel warm and inviting.  The design of this bathroom begins and ends with a focus on the white carrara marble that was used not only pervasively in the shower, but also for the entire floor of the bathroom.  Large 12 x 24 flooring tiles lay atop a radiant heat pad that covers all areas that are accessible by foot.  Walking on this floor makes your feet happy :) Carrara marble slabs are the first thing the eye picks up upon entering the room.

The free standing tub was built for us in Georgia and the tub filler was sourced from Portugal.  Other details about this bathroom - limestone tile used on the wall behind the vanities creates a sense of drama.  The wall mounted faucets are a perfect compliment to the style of the bath, and provide for very easy counter wipe downs.  I utilized a 3" thick Quartz countertop in this space.  More carrara on the tops would have been just too much, so I found something that played off the shape and color of the tub.  The overall feel is an inviting space that is luxurious, elegant, modern, and calming.

[gallery columns="2" type="rectangular" ids="746,747,748,749,750,751,752,753"]

Innovations in Natural Stone

I attended an event at Galleria of Stone last night and was amazed with some of the natural stone that was on display.  Galleria of Stone has on display one of the most innovative granite products that I've seen in a while.  In a nutshell, fabricators overseas have the ability to etch a myriad of designs onto the face of any slab of granite.  There are approximately 72 different designs that they have come out with to this point in town.  Roughly 24 of these are on display.  The slabs come into the United States with the designs already etched onto the faces.  Stone is then fabricated here using the standard practices.  Here are some close up pictures of some of the different designs available.  Remember these are available in full size slabs! [gallery type="square" columns="2" ids="726,727,728,729,730"]

Dramatic Kitchen Shines in this Mountain Retreat

Every once in a while, a project comes along that is really special.  Now, that's not to take away anything from any of my other remodels or new construction projects - but sometimes you are lucky enough to be part of a project in which all of the involved parties have an unquenchable thirst to build something that pushes our creative boundaries in the quest to provide a truly unique space.  This house, this kitchen is definitely one of these spaces, and it shows through in every room of the house.  I was hired by the interior designer on this project to provide the cabinetry design for this kitchen.  We started from scratch and built something that we had never done before.  I'm quite proud of the result. You'll notice that all of the cabinetry has a reflective surface in the door.  I had to work with our cabinet shop to create a new door that would accept both a bronze glass panel and a cherry veneer panel in the door.  It wasn't easy but we figured it out and the end result is beautiful!  The Sub Zero housing is encased in a floor to ceiling column that is cladded in a natural stone.  The housing itself had to be completely re-thought from our standard because of the door swings on the refrigerator, hence the 135 degree angles on the pilasters that anchor either end of the housing.  Above the fridge, we placed a piece of Lumix Quartz (same as countertops).  The result is a piece that mimics a work of art instead of an appliance.

If you are interested in working with any of the other professionals associated with this project (interior designer, architect, builder), please get in touch with me.

[gallery type="rectangular" columns="2" ids="714,715,716,717,718,719,720,721"]

Cherry Creek Loft - European Styled Kitchen and Bath

The Kitchen

I think that when most of us think of "modern" style, we tend to associate it with very cold spaces that are fun to look at, but seem fairly sterile and cold.  Contrarily, this space is definitely modern, but also feels warm.  I accomplished this feat by pairing high gloss custom color laminate wall cabinetry against a matte finish, dark cabinet below.  The dark cabinetry is actually a rift cut gray oak veneer with a custom stain on it.  Luxury appliances by Sub Zero and Wolf allow this sleek kitchen to perform at a very high level as a chef's preparation area.  I designed a custom cabinet to house a dishwasher about 12" off of the floor.  This higher placement makes using the appliance much easier.  The end result is a space that doubles as both a wonderful cooking haven and a entertaining space.

[gallery columns="2" type="rectangular" ids="681,682,683,684"]

The Master Bathroom

The master retreat - as I like to call it - is just that: a retreat from the stresses of daily life.  It's a very calming room when you step into it.  Subtle colors on cabinetry, tile, and countertops are a nice compliment to the cool blue metallic paint used on the walls.  A very nice place to start your day...or end it.

[gallery columns="2" type="rectangular" ids="689,690,691,692,693"]

12' Solid Wood Island Countertop Anchors this Kitchen

This spectacular island countertop is solid cherry wood. It measures 2-1/2" thick x 140" length x 45" width.

There are several radius details along with arcs on both ends and custom cutout for the 36" gas rangetop and integrated downdraft.  Needless to say, I spent a lot of time designing this piece and spent more than a few restless nights worrying about the details of installation and integration to the island.  Fortunately, our shop did a fantastic job creating the top and it turned out stunning.

But enough about the island countertop.

The design of this kitchen evolved over time.  We began with a standard galley kitchen and decided to open up the kitchen into the main living room, which ended up being a great idea.  There is more than enough room for two chefs to work simultaneously here and not bump into each other.  The Sub Zero armoire is 9' tall and mirrors the height of the tall pantry / microwave cabinet on the opposite side of the room.[gallery columns="2" type="rectangular" ids="669,670,671,672"]

European Styling in the Heart of Cherry Creek

I knew this kitchen would turn out wonderful when I first met the client.  She was open to exploring the options available in new materials and was more than willing to "go that extra step" with the design that took it from great to amazing.  The tall and upper cabinetry is a high gloss gray laminate and the base cabinetry is a composite rift cut white oak veneer with a custom stain on it.  This was a difficult kitchen to plan for, as we had to order the cabinetry from two different manufacturers, yet make it look seamless.  I think we accomplished this feat to perfection. These photos were taken by yours truly so the quality isn't fantastic.  We plan to professionally shoot this project in about a month though, so I'll post those photos as soon as they're available!

[gallery type="rectangular" ids="663,664,665"]

Cooking appliances:  Wolf induction cooktop, island hood, and oven/microwave.  Sub Zero refrigeration.  All integrated and all very sleek.  We raised the dishwasher in a custom cabinet to elevate it 12" higher than normal.  It is very easy to get into and out of.  That sort of configuration is not always doable and is based on the space available to us.  In this case, it worked perfectly - so why not??

The perimeter stone is quartz and the island is honed granite.  Stainless steel upstands and back-painted glass doors also add to the character.

Crown Moulding Sketch

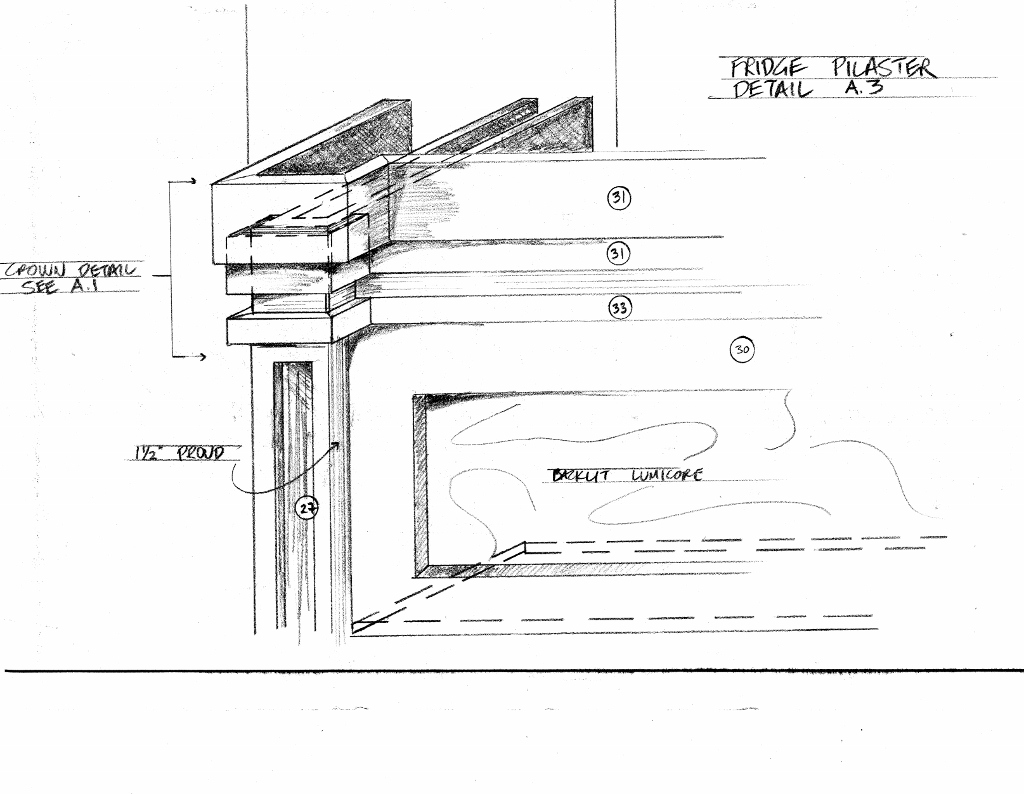
Here's a sketch of a crown moulding detail in a project I am working on.  This particular moulding has three steps to it.  The top rail of the cabinetry is extended to 6" total height, leaving 4.5" to apply S4S...Through application of three pieces of square edged moulding we are able to produce a four step crown. Best part about this detail is the stainless steel banding that we are adding to the whole moulding stack.  A piece of stainless steel, 1/8" thickness will be added after the mouldings are installed to give an added dimension to the cabinetry.


Classic White Kitchen - Observatory Park, Denver

Believe it or not, I started working with this client in the summer of 2011, and today is March 27, 2012 - which means I've waited a long time to see this project come together - I think it's going to be worth the wait. This is new construction in the Observatory Park neighborhood of Denver.  The house would feel right at home in any cozy New England town (New Canaan?) , so we took great care to make sure the kitchen and other rooms (we are installing cabinetry in 11 rooms in this home) had the feel of an updated colonial classic that would fit right into any New England colonial.  The pure white paint in the kitchen makes the space really light and airy.  The floors will eventually be stained dark, so there will be a very dramatic contrast there between floor and cabinet.  This classic kitchen will really be fantastic when complete...

Here are a few installation pics of the kitchen.  I'll update when I have some better finished pictures.

[slideshow]

Kitchen Lighting Ideas

Kitchens and baths really need great lighting in order to be a success.  Don't make the mistake of leaving this detail out of your plans until it's too late.  So before you finalize everything in the planning stage, make sure that you have taken these three things into account: 1) Where and what type of GENERAL lighting do you want in the kitchen, i.e. - recessed cans, pendants, etc...

2) What type of TASK lighting do you need to perform your daily tasks such as meal preparation, coffee making, and cleaning?

3) What type of ACCENT lighting do you want, if any at all?  This can include interior cabinet lights, cove lighting, etc...

4) What kind of bulbs do you want to use?  Do you want halogen, xenon, LED, or flourescent undercabinet lights?  What kind of bulb do you want to use for your recessed can lights and fixtures?

GENERAL LIGHTING

The first thing to do is to gauge how much natural light from windows and skylights is available.  For instance, during the planning phase of my own kitchen remodel in the summer of 2011, we decided that there was just not enough natural light in the kitchen.  Our kitchen is situated in the northeast corner of the house (read: least amount of sunlight) and the two windows to the kitchen were shaded by the roof over our covered deck.  The first thing we did was add two skylights to the roof to increase the amount of natural light.  It was a bit costly up front, but as a result, we never have to turn our lights on during the day.  Over the life of our stay in this home, we think the energy savings from not running lights during the day will effectively pay for the two skylights.

If your kitchen is really dark, considering adding a skylight, or even a window.

After gauging your natural light, determine how much general lighting you want.  It's best to have 4" or 5" recessed can lights spaced about 48" apart from one another over the countertops, and a few well placed recessed can lights in the center of the kitchen.  4" cans cost a little more than the standard contractor-grade 6" versions.  However, the smaller version definitely is a more pleasing aesthetic look.  Don't forget to plan where and how you want to switch them on and off.  If you have multiple entrances to the kitchen, you definitely want these lights to be switched at the main entry points using a three way switch. It's also a great idea to install a dimmer switch at one location so you have the option of lowering the light output.  There are no rules except one:  always try to center a can light (or hanging pendant) over the main sink.

Check out the difference a bigger window and removal of covered porch made in this kitchen.

TASK LIGHTING

This refers to the lighting that you use to perform daily tasks.  Cleaning, making meals, chopping broccoli, bathing your child in the sink...etc.  No matter how great your general lighting is, you'll definitely need some task lighting.  The most important is under-cabinet lighting.

I recently came across this light, which I think is great.  It throws off a ton of light and it's an LED, so it's really energy efficient and it will never emit any heat.   Traditionally, LED lights have been much more expensive than Xenon or Halogen.  However, just as with all technology, as the number of manufacturers has increased, production costs have come down.  This one is quite affordable and I have it specified for a large kitchen in Vail, which will install in June.

Place your undercabinet lights at the front of the cabinets, not at the back.  This will produce the best result and better distribute light on the counter surface.  Most undercabinet lights come in several different lengths, so you should be able to find one for most every cabinet width.

One important caveat to LED lighting: It's what you call "low voltage".  The 15amp circuit that feeds the undercabinet lights is not wired directly into the light.  Instead, a "driver" or "transformer" is needed to reduce the voltage prior to feeding the light.  It can be complicated, so it's best to just specify the type of light you want, and then hand it off to the electrician to figure out the rest of it.  There are several restrictions on length of cable used and number of lights allowed per driver.  A good lighting store should be able to sort you out.  Just don't expect to get answers to these questions from Home Depot or Lowe's (I really prefer Lowe's - much better don't you think?)

[polldaddy poll=6071277]

ACCENT LIGHTING
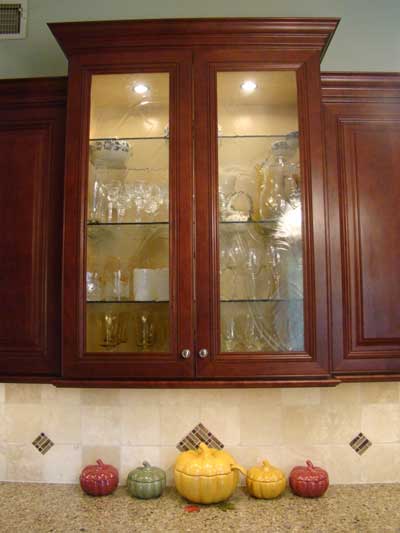
Accent lighting is what usually sets the great kitchens apart from the ones that are just "good".  It's a well placed fixture or an interior light behind a glass door that can really make a space pop.  For these types of applications, you're really not going for a light that is super bright...You're looking for something that just accents a desired space, such as the interior of a cabinet, or the space between crown moulding and a ceiling.

Think about whether or not your cabinetry will join to the ceiling, or if it will stop short of the ceiling.  If your crown moulding stops short of the ceiling, it might be a  nice idea to add some rope light on top of the cabinets for a cool ambient feel.

On the "way out there" spectrum, translucent stone is now also being back lit for really dramatic effects.  Check out this picture of a quartz countertop which has been backlit from beneath:  

Limestone Backsplash Tile

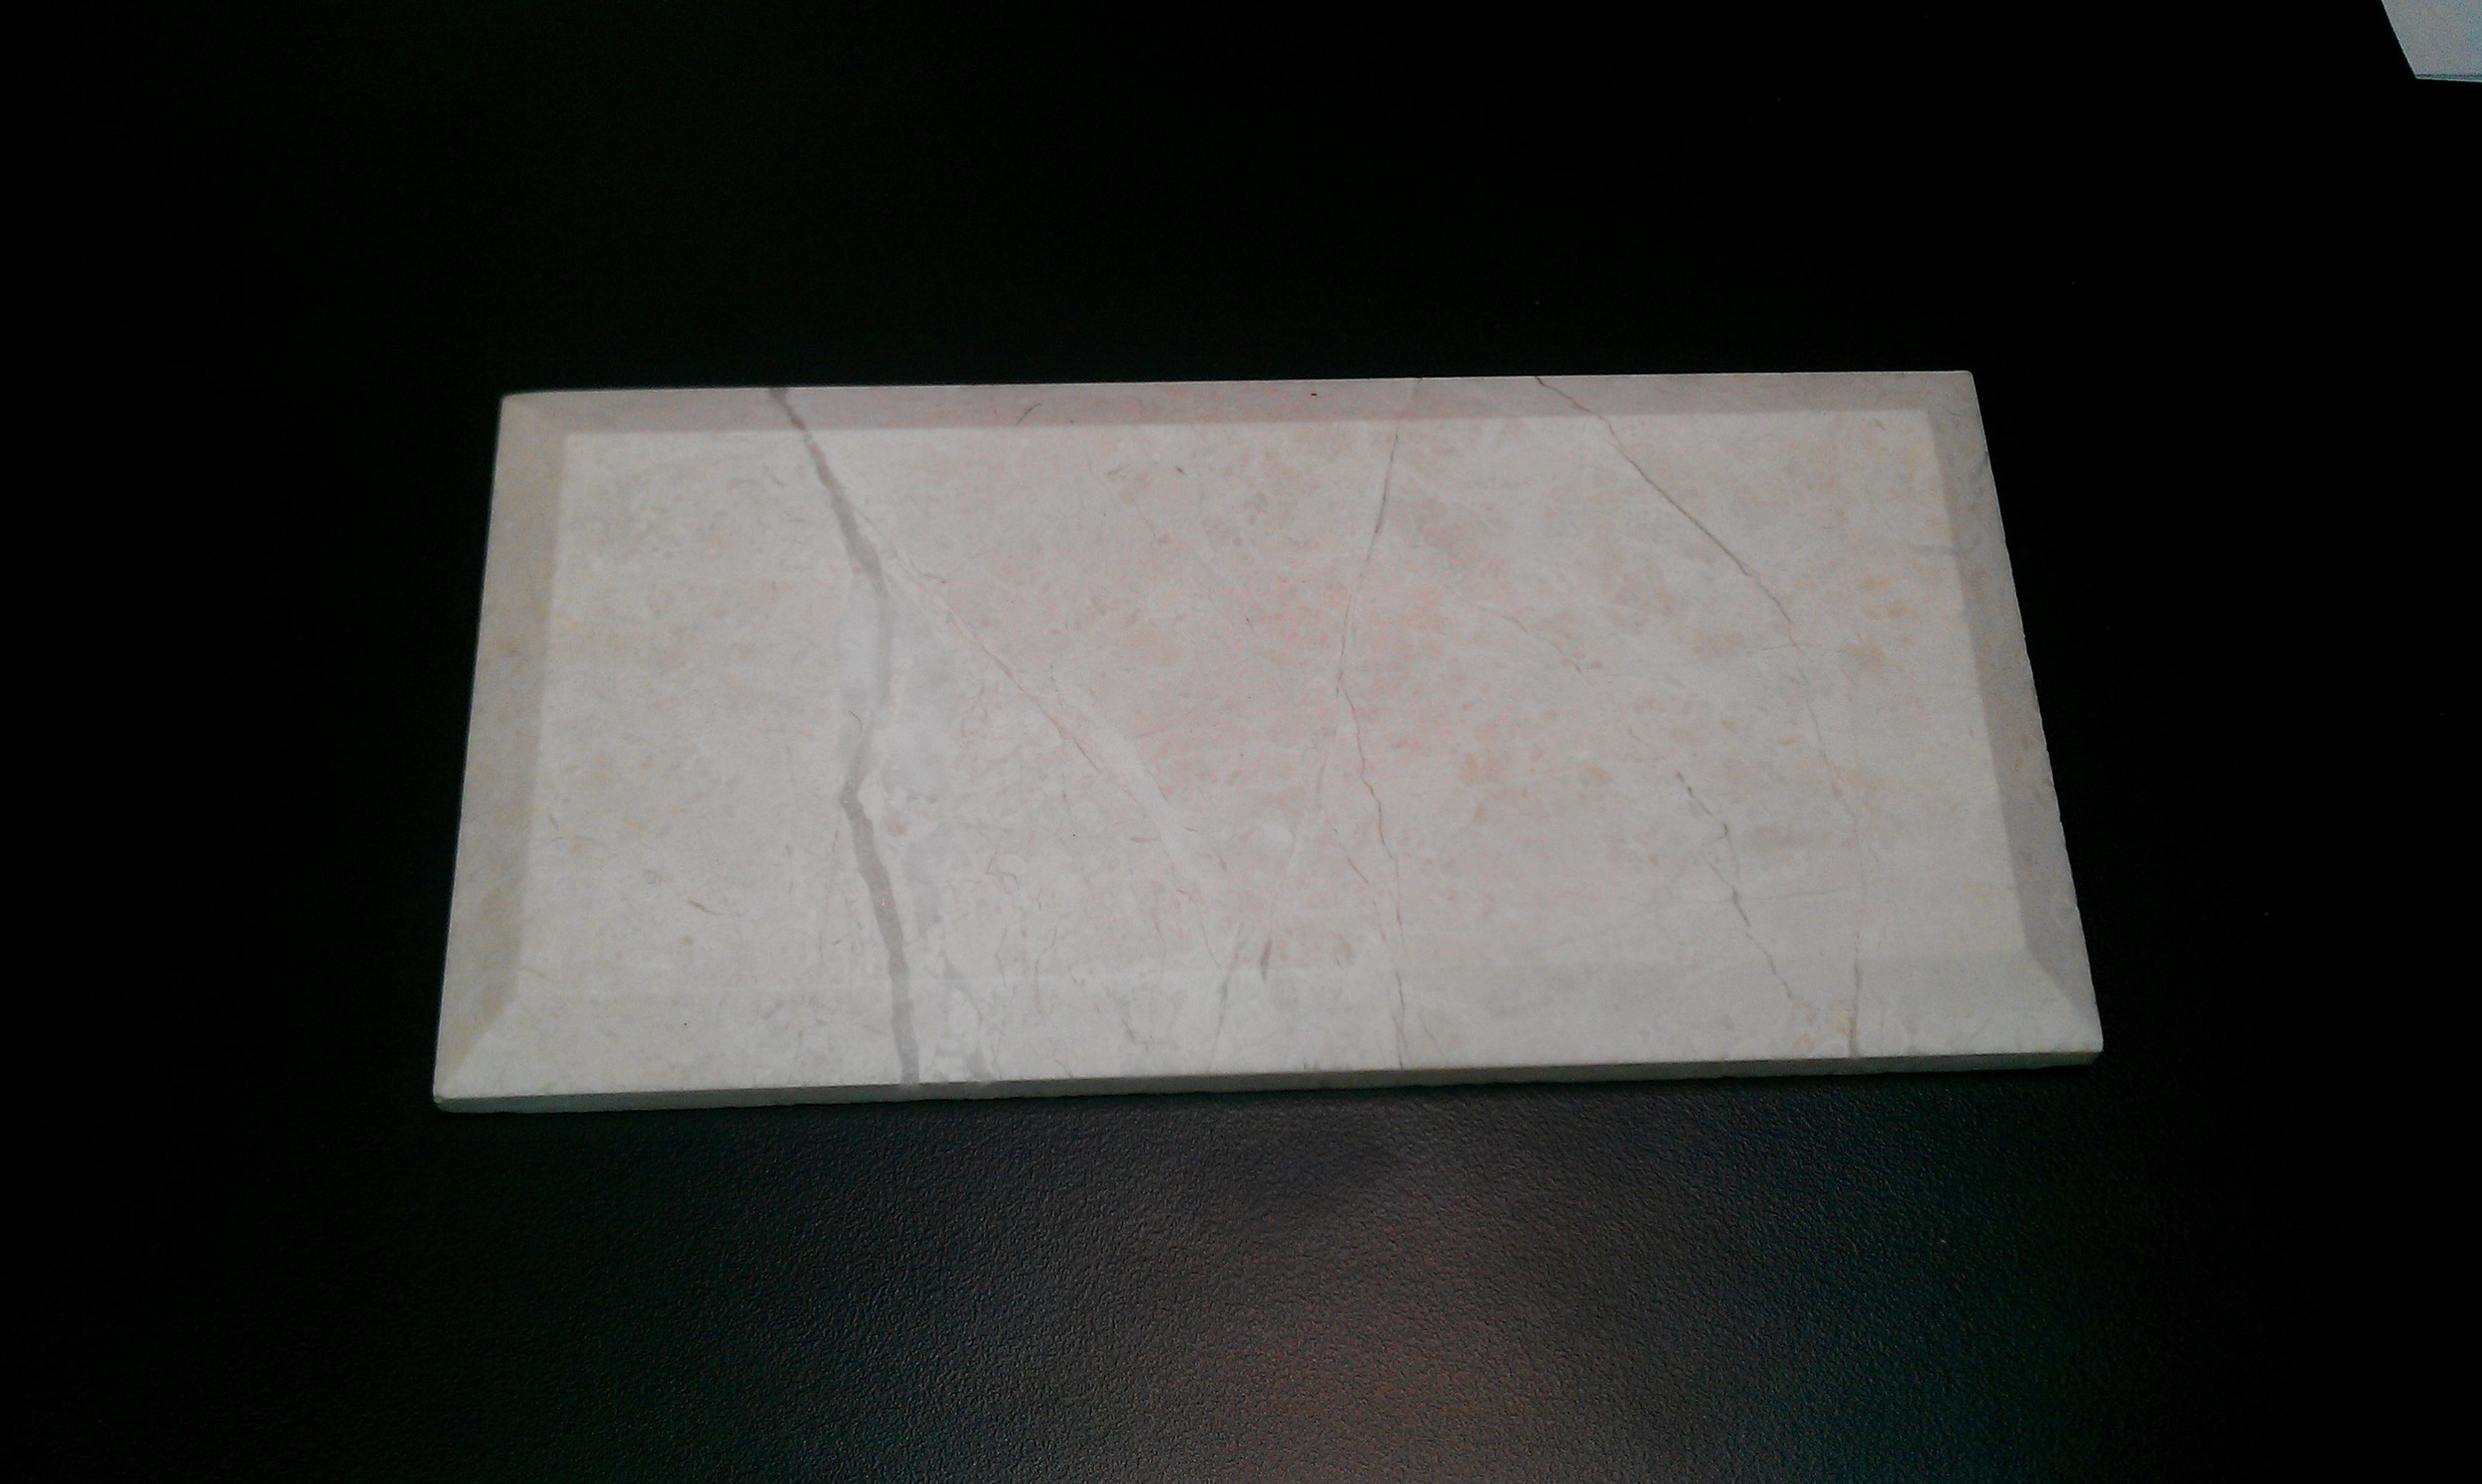
Found this little guy and immediately started looking for a project to use it on.  Paired with Typhoon Bordeaux Granite, it's going to be a really fantastic backsplash.  We're using it in a current project as we speak. It installs end of next week.