
A few shots from a job site in Greenwood Village. This spectacular home is built in a southern traditional style. It would feel right at home in North Carolina or Georgia. This kitchen has TONS of storage, seating for 5 and a full set of professional grade appliances that will be installed soon. Clients are hoping to get in before Christmas! [gallery columns="2" type="square" ids="845,844,843"]
denver kitchen design
Custom Glass Wine Enclosure with a View!
My clients asked me to design an area to store their wine inside their corner unit on the 28th floor of The Spire building, in downtown Denver. I found the wine racking system locally here in Denver. VintageView; a Denver based wine cellar company provided the interior racking system. None of their standard units were perfect for our application, so they made a custom rack for us and delivered it directly to the building. The sides of the racking system are made out of a high quality clear acrylic that is 3/4" thick. Each rod is polished stainless steel. In all, the unit weighs in at over 250lbs and is extremely sturdy. It is a free standing system that can be placed anywhere. We chose to enclose the 350 bottle capacity wine rack with a custom glass surround. 1/2" industrial grade tempered glass was used and we worked with Denver Glass Interiors to create the finished product. Not shown in this photo: LED lights are strategically placed along the floor. They shine upward - creating a really unique effect for entertaining.
I know what you're thinking - with all that light, it's really going to mess with the wine! AHH HAAA - I brought in a special commercial window tinting specialist to advise on this. As it turns out, the windows in this LEED certified building are all super Low E...meaning they block 99% of all UV rays, and a lot of the heat. Also - the patio of the unit above this apartment casts a year long shadow over the windowed area where we installed the glass enclosure. But just to be sure, the homeowners also had auto-blinds installed behind the wine rack. The blinds are operated by remote control and can be closed in any situation where directly sunlight makes its way into the apartment.
I think this wine enclosure is awesome. It was the first one I had ever designed and I think that it turned out amazing. I can easily see using this version or a modified version of it (possibly temperature controlled) in any wine enthusiast's home.

Water Jet Technology in the Bathroom
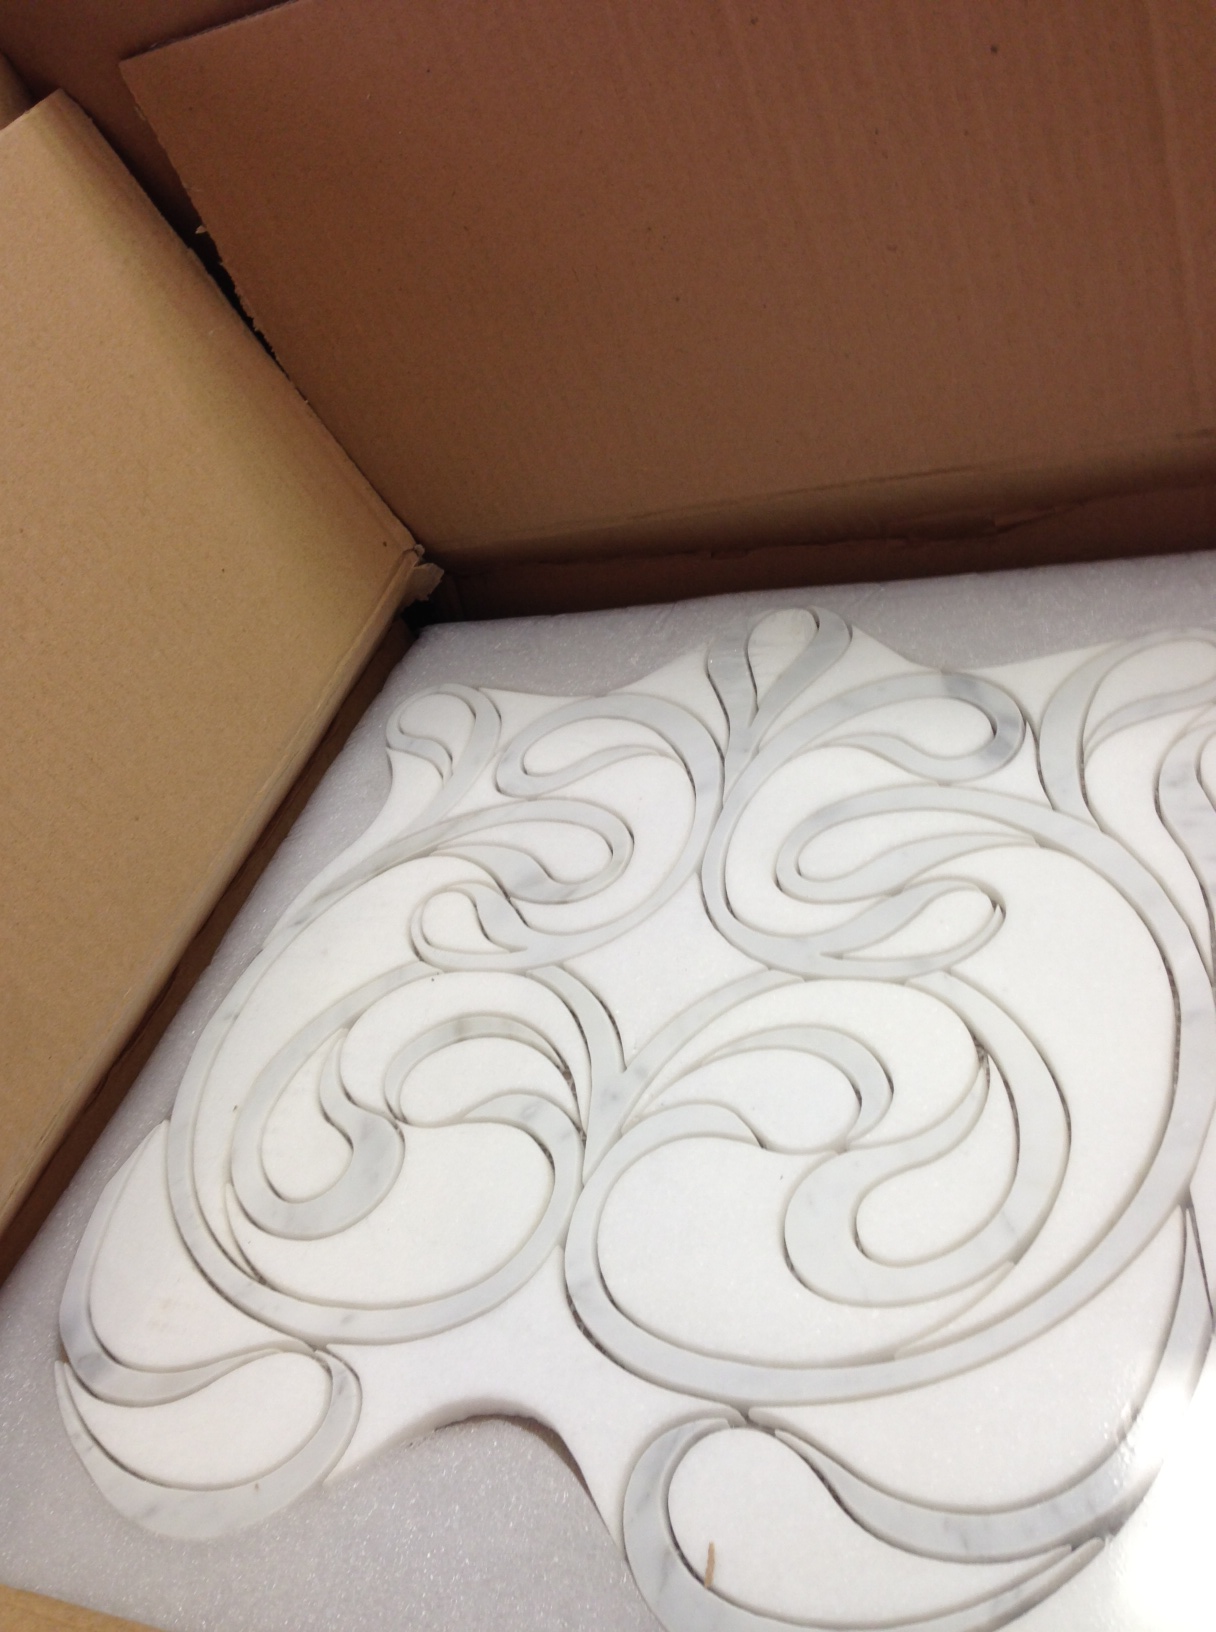
I've posted in the past that water jet technology is making its way into stone and tile manufacturing. It's allowing the manufacturers to cut really intricate designs into the stone and create some very elegant mosaic patterns. Below, a quick shot of a water jet natural stone mosaic (created out of thassos and calcutta gold marble) that I received in my office this week. We are using 8 of these beautiful mosaic tiles to create a 2' x 8' mural in a shower in Cherry Hills Village. I will post photos of the finished bathroom once we are done and include some detail shots of the mosaic as well.
Historical Remodel in Cheesman Park
My client has painstakingly restored this beautiful Denver Square over the past three years. I was fortunate enough to work with him on the kitchen and three bathrooms in this residence. We carefully planned each space to have its own unique character. I respected the history of the home as much as possible throughout the design phase. We saved items from each room and integrated them into the new design so that our new kitchen and baths had a similar feel to the rest of the home. Photography by Teri Fotheringham.
The Kitchen
Exposed brick walls in the kitchen thoughtfully contrast the stainless steel range and pro hood. It's the classic, "Old and New", theme that I like so much. Also in the kitchen, original leaded glass panes of glass were preserved from the original cabinetry and integrated into the new cabinetry. I literally designed the kitchen around these glass panes. We removed a large load bearing wall and replaced it with a 20' long steel beam to gain some much added space. The client desperately wanted an island - any island - in his kitchen. I designed a small functional island with a lot of storage in the middle of the kitchen and it even has space for two small bar stools...
[gallery type="rectangular" ids="805,804,803,802,801,800,782,781,780"]
The Bathrooms
We gutted all three bathrooms in the home, and all three now have their own unique feel and charm. The powder room is simple and sophisticated. A white porcelain vessel sink sits atop a piece of granite. The wall mounted bridge faucet adds interest. A tin ceiling, adds a bit of drama to the space.
[gallery type="square" ids="813,814"]
The Master Bathroom again utilizes an exposed brick wall. Interestingly enough, the brick wall was not part of the original design. It was covered in plaster and we had no idea it would look so stunning when we took the plaster down. However, after seeing the space with the brick exposed, it was a no brainer to just restore the brick and leave it as a statement wall in the bathroom. All the surfaces are custom concrete forms that I designed myself. An integrated planter tray, with its own drainage system is actually the same piece of concrete as the shower bench. A piece of frameless shower glass separates shower bench from planter.
[gallery type="square" ids="819,818,817"]
The upstairs hall bathroom was a different style all together. The owner wanted to provide a very sophisticated, clean, white space for his guests to use. To capture that dynamic, I utilized an antique white penny round flooring tile, and sourced a very simple white pedestal sink and free standing tub. The waincot paneling, which I also designed, has white glass center panels. The mixture of glass and wood updates the space and gives it a glamorous feel.

Installation of Beautiful Stonewood Granite
Stonewood Granite is pretty cool stuff.
I'd never seen it before about two months ago. We found this slab at The Stone Collection in Denver. This picture is from a project in Observatory Park, Denver. The granite was installed on Tuesday....It's really striking when you see it up close. Of course, we'll get some pro shots of the finished project when it is complete.

Scouting Shots - Historic Remodel in Cheesman Park
The before and afters speak for themselves! This kitchen was tiny, dilapidated, and really poorly laid out. We removed a load bearing wall and put a steel beam in place to open up the space. The inset cabinetry is painted with a glaze & really feels like it has been there for a hundred years. Check out the leaded glass in the two wall cabinets next to the new stainless steel hood. We salvaged the glass from the original cabinetry and used it in the new cabinetry. I found hardware that matched the original cabinet hardware exactly, to keep the old feel of the home intact. The exposed brick wall looks great against the stainless steel range and hood. It was meticulously restored to original condition by a skilled mason. These are the scouting shots, so please forgive the messiness of the kitchen! I didn't have a lot of time to take the pictures. I am hoping to get some pro shots in the next month or so... [gallery type="square" ids="778,775,779,776,780,781,782"]
Transitional Bathroom Remodel - Bonnie Brae Neighborhood Denver
I always say that I strive above all else to keep the clients' vision at the heart of my design. It's a real sticking point for me. Honor that vision from start to finish. The first time I met these clients, they communicated to me how much they love the look of marble. They also wanted a space that was "transitional" in style. The new bathroom needed to be modern, yet also feel warm and inviting. The design of this bathroom begins and ends with a focus on the white carrara marble that was used not only pervasively in the shower, but also for the entire floor of the bathroom. Large 12 x 24 flooring tiles lay atop a radiant heat pad that covers all areas that are accessible by foot. Walking on this floor makes your feet happy :)

The free standing tub was built for us in Georgia and the tub filler was sourced from Portugal. Other details about this bathroom - limestone tile used on the wall behind the vanities creates a sense of drama. The wall mounted faucets are a perfect compliment to the style of the bath, and provide for very easy counter wipe downs. I utilized a 3" thick Quartz countertop in this space. More carrara on the tops would have been just too much, so I found something that played off the shape and color of the tub. The overall feel is an inviting space that is luxurious, elegant, modern, and calming.
[gallery columns="2" type="rectangular" ids="746,747,748,749,750,751,752,753"]
Dramatic Kitchen Shines in this Mountain Retreat
Every once in a while, a project comes along that is really special. Now, that's not to take away anything from any of my other remodels or new construction projects - but sometimes you are lucky enough to be part of a project in which all of the involved parties have an unquenchable thirst to build something that pushes our creative boundaries in the quest to provide a truly unique space. This house, this kitchen is definitely one of these spaces, and it shows through in every room of the house. I was hired by the interior designer on this project to provide the cabinetry design for this kitchen. We started from scratch and built something that we had never done before. I'm quite proud of the result. You'll notice that all of the cabinetry has a reflective surface in the door. I had to work with our cabinet shop to create a new door that would accept both a bronze glass panel and a cherry veneer panel in the door. It wasn't easy but we figured it out and the end result is beautiful! The Sub Zero housing is encased in a floor to ceiling column that is cladded in a natural stone. The housing itself had to be completely re-thought from our standard because of the door swings on the refrigerator, hence the 135 degree angles on the pilasters that anchor either end of the housing. Above the fridge, we placed a piece of Lumix Quartz (same as countertops). The result is a piece that mimics a work of art instead of an appliance.
If you are interested in working with any of the other professionals associated with this project (interior designer, architect, builder), please get in touch with me.
[gallery type="rectangular" columns="2" ids="714,715,716,717,718,719,720,721"]
Cherry Creek Loft - European Styled Kitchen and Bath
The Kitchen
I think that when most of us think of "modern" style, we tend to associate it with very cold spaces that are fun to look at, but seem fairly sterile and cold. Contrarily, this space is definitely modern, but also feels warm. I accomplished this feat by pairing high gloss custom color laminate wall cabinetry against a matte finish, dark cabinet below. The dark cabinetry is actually a rift cut gray oak veneer with a custom stain on it. Luxury appliances by Sub Zero and Wolf allow this sleek kitchen to perform at a very high level as a chef's preparation area. I designed a custom cabinet to house a dishwasher about 12" off of the floor. This higher placement makes using the appliance much easier. The end result is a space that doubles as both a wonderful cooking haven and a entertaining space.
[gallery columns="2" type="rectangular" ids="681,682,683,684"]
The Master Bathroom
The master retreat - as I like to call it - is just that: a retreat from the stresses of daily life. It's a very calming room when you step into it. Subtle colors on cabinetry, tile, and countertops are a nice compliment to the cool blue metallic paint used on the walls. A very nice place to start your day...or end it.
[gallery columns="2" type="rectangular" ids="689,690,691,692,693"]
12' Solid Wood Island Countertop Anchors this Kitchen
This spectacular island countertop is solid cherry wood. It measures 2-1/2" thick x 140" length x 45" width.
There are several radius details along with arcs on both ends and custom cutout for the 36" gas rangetop and integrated downdraft. Needless to say, I spent a lot of time designing this piece and spent more than a few restless nights worrying about the details of installation and integration to the island. Fortunately, our shop did a fantastic job creating the top and it turned out stunning.
But enough about the island countertop.
The design of this kitchen evolved over time. We began with a standard galley kitchen and decided to open up the kitchen into the main living room, which ended up being a great idea. There is more than enough room for two chefs to work simultaneously here and not bump into each other. The Sub Zero armoire is 9' tall and mirrors the height of the tall pantry / microwave cabinet on the opposite side of the room.[gallery columns="2" type="rectangular" ids="669,670,671,672"]
European Styling in the Heart of Cherry Creek
I knew this kitchen would turn out wonderful when I first met the client. She was open to exploring the options available in new materials and was more than willing to "go that extra step" with the design that took it from great to amazing. The tall and upper cabinetry is a high gloss gray laminate and the base cabinetry is a composite rift cut white oak veneer with a custom stain on it. This was a difficult kitchen to plan for, as we had to order the cabinetry from two different manufacturers, yet make it look seamless. I think we accomplished this feat to perfection. These photos were taken by yours truly so the quality isn't fantastic. We plan to professionally shoot this project in about a month though, so I'll post those photos as soon as they're available!
[gallery type="rectangular" ids="663,664,665"]
Cooking appliances: Wolf induction cooktop, island hood, and oven/microwave. Sub Zero refrigeration. All integrated and all very sleek. We raised the dishwasher in a custom cabinet to elevate it 12" higher than normal. It is very easy to get into and out of. That sort of configuration is not always doable and is based on the space available to us. In this case, it worked perfectly - so why not??
The perimeter stone is quartz and the island is honed granite. Stainless steel upstands and back-painted glass doors also add to the character.
A Traditional Kitchen Remodel
 The clients, in Centennial Colorado, were interested in garnering more prep space on the countertops, updating their look, and most importantly increasing the functionality of their kitchen. It's a difficult space! With multiple openings, and only one true wall to work against, it was definitely a challenge coming up with a design that would satisfy all of their needs.
The old kitchen was white, builder grade. The induction cooktop was located on the island, and their previous peninsula, to the right of the sink was desk height and awkward. There was a serious lack of preparation space. By stealing space from a pantry and walkway into garage, we were able to add seating for 4 people comfortably, take the cooktop off of the island, and add much needed counterspace to the back wall. One of the biggest structural changes we made was removing a stand alone coat closet in the middle of the house. You can see the difference it makes in the before/after pictures below.
The backsplash tile is a 3 x 6" polished limestone that we found at Decorative Materials in the Denver Design Center. I wrote about this tile here, and it ended up being the perfect compliment to the Typhoon Bordeaux granite.
The true star of the kitchen is the 2-1/2" thick butcher block top. It's a combination of walnut and maple, end grain. This top was painstakingly created in Pennsylvania and shipped to Colorado, where it sits atop a mobile island. Yes, the island is movable. We sourced low profile casters and installed them on the bottom of each island post. The result is a space that is truly multi-functional and very friendly for two cooks.
[gallery type="rectangular" ids="627,628,629,630,626,625,622,621,623,624"]
What is Induction Cooking?
in Updates
Induction What does it mean, and how does it boil water faster, and more efficiently than gas or electric burners?
Will your current set of pots and pans work with a new induction cooktop and how can you be sure?
Why should you consider induction cooking for your kitchen?
How the heck does it work???

I know. It's strange. It's a little different way of thinking about cooking. For those of us that can let go of our preconceived biases regarding gas burners and how they outshine and outburn everything else, induction might be a perfect fit for our kitchens.
How Does Induction Work?
Induction occurs when heat is "induced" into a piece of cookware by an electromagnetic field. The "element" is a high frequency electromagnetic unit that is situated underneath the ceramic or glass cooktop surface. (see the picture to the left- It's the coils!) Induction uses sophisticated electronics in the element to generate electromagnetism. This magnetic field is very strong. When a piece of magnetic material - such as a frying pan - is placed on top of the cooking surface, the magnetic field is transferred to the pan. This magnetism agitates the molecules at the very core of the pan's makeup and they begin to shake and vibrate very quickly, producing friction.
Have you ever pulled your hands too quickly along a rope and gotten a burn? That's friction. The heat that is released (and burns your hands) is the same type of heat that the induction cooktop uses to cook that bacon you've been salivating over all morning.
Here's the main thing to take away: induction cooking transforms your piece of cookware (a frying pan, for example) into the actual cooking surface.
Yeah, it Sounds Great, but How Does it Perform?
There are three aspects to this. How fast does an induction cooktop heat up? How controllable are the temperatures? How about energy efficiency?
Let's start with energy efficiency. Hands down, induction is simply the most energy efficient way to cook that exists today.
On average, induction cooking is 85-90% energy efficient. That means that about90% of the energy produced is actually delivered to the source. Gas, on the other hand is only 40% efficient! Most of the heat generated is lost between the time the flame is turned on and the point at which heat is delivered. Induction is TWICE as efficient as gas when it comes to energy delivery. WOW.
The following statistics are courtesy of Meyer Corporation / Jenn Air
Click here for statistics: Induction

How about controllability??
Well let me tell you. It's just as easy to control an induction cooktop's heat as it is gas or electric. I don't have any statistics to show you, but I can say from experience that it is very easy to control the heat source. You can still simmer your Gramma's sauce all day without burning the pot.
I've Heard About Induction's Ability to Boil Water Quickly, but Exactly How Fast is it??
It's not just boiling water. The example of how fast it takes to boil water is just the easiest visual for most of us. So how fast is it?
Let's use some more statistics from Meyer Corporation / Jenn Air
The following times are based on the time to bring to boil 2 QUARTS of water
Induction: 4m 45s
Gas: 8m 18s
Electric: 9m 50s
Induction is just about twice as fast as the next best option. I think this is pretty self explanatory, so I won't go into more detail about it.
Will My Pots and Pans Work with an Induction Cooktop?
There has been a lot of backlash against induction because of a misconceived notion that your current set of pots and pans will not work with it. That may be a little bit true, but for the most part, it is not. It is also a widely held belief that you need to spend hundreds and hundreds of your hard earned dollars on a new set of "induction-ready" pots and pans. That also, is not true.
How can you determine if your pots and pans will work with an induction cooktop? Simple. Take a magnet and place it on the bottom of your cookware. If it sticks, your pot will work. If not, then you need to go shopping.
Don't be conned into paying an arm and a leg for an expensive set of cookware if you don't really want to. There are plenty of induction ready cookware sets available at places such as Costco that won't burn a hole in your pocket. As with anything though, you get what you pay for. Many cheaper pots and pans have "hot spots" or non-ergonomically designed handles. These may work with an induction cooktop, but you may not get optimum performance out of them.
How to Build Wainscot Paneling
in Educational
Wainscot paneling is something I used to do a lot of when I lived in the Northeast. It's found in many older traditional homes, and is often replicated in remodels and new construction to achieve a warmer feel for a space and add interest to otherwise plain walls. Wainscot comes in many different heights, styles, and variations. It can be created with a variety of materials, but wood is mostly used for the construction.

Originally, wainscotting was used in 16th century English homes to combat rising dampness. England has a very humid and damp climate, and this was one method that early builders used to fight mold and mildew that would rise up out of the ground and infiltrate the lower portions of walls in homes.
Now, it is used mainly by designers and builders to adorn the walls of upscale homes. It is traditionally painted or stained and, like I said, can come in many different variations.

Steps to Create Wainscot
1. Rip your horizontal rails to the desired width. If you are planning on a 3" exposed rail and you have a 4" baseboard, then your rails should be ripped at 7", as the rail will be applied first and the baseboard attached to it, flush to the floor. Use 3/4" thick MDF (medium density fiberboard) or paint grade plywood if you are planning on painting your wainscot. If you desire a stained wainscot, then take care to select only the best boards for your material, as the stain will accentuate any grain patterns or defects that are found in the wood.
2. Mark stud locations on wall.
3. Draw level lines at the desired heights and then nail your wainscot to the wall at the locations where you previously marked off studs.
4. Next, mark off your desired locations for vertical stiles. Nail these into place as well, and be sure to apply ample wood glue to the ends that will abut the horizontal stiles and rails.
5. After you have nailed your stiles and rails to the wall, you'll have a pretty good idea of what the end product will look like. Miter your chosen panel mold or inside profile into the panels, per your design.

6. Add your chair rail and cap mold. Here's where you can get creative. There is no set way to build wainscot. Take your time designing and drawing before you start any nailing or building. Draw the panels out on the wall to ensure that you like the size and shape of them.
7. Finally, all of the nail holes and joints will need to be filled with putty and sanded to a smooth finish.

8. Your wainscot will need to be primed first, and then painted with a minimum of two coats of paint. I recommend spraying the paint, as brush application will take a very long time, and the sprayed finish gives a very uniform even coat.


Integrated Appliances - What's the Big Deal?
in Educational
Integrated appliances might be mystifying to some, but its actually pretty darn simple stuff.
Read More